Address-import (Excel)
Inhaltsverzeichnis
Address-Import (Excel)
For the best and most comfortable option to import large quantities of adresses and notes to WICE we recommend using the Excel-Import feature. You can access the import via the Administration of WICE->Database by clicking on Address import (XLS).
To identify your adresses by WICE during the import process you need to add the matching titles to your columns of your Excel sheet, according to their usage in the WICE database.
Please note that your Excel-File can not be password protected in order to use it with the Excel-Import!
| Wichtig: The column title for the company name "address_company.name" in your Excel-file is mandatory and only plain black text in your column titles are allowed in order to proceed with your import! |
You will have to add the matching column title in the first line of your Excel sheet. All of the supported column titles are listed here at the end of this chapter with a brief explantation or listed on the page of the Excel-Import - Step 1. Please also read carefully the remarks on the start screen of the import because these contain more useful hints as for example how to use the same colummn titles repeatedly to merge the contents of these columns in WICE or how contents of custom fields for addresses and contact persons need to imported into WICE.
Before you can start your import your need to prepare your Excel sheet with your addresses according to these prerequisites, so that you can import them into WICE.
Here you see an example of an Excel sheet ready to be imported by the WICE Excel-import. Of course a sheet can contain more fields. It is most important that the column titels are in the correct format so that WICE can match them. We will send you an Excel-file as an example with all possible column titles, so that you are able to copy these into your sheet and avoid any typos. WICE will only be able to identify these titles if the spelling is identical - it will also list during the import process all the column tites found in your sheet.
If you have more than one contact person for a company address and you want to import them, you will have to add for every contact person another line in your sheet with the same fields for the company address including the personal information for your contact person, so that WICE can add this contact person to the already exisiting company address. It is not possible to import more than one contact person in the same line for the same company address. WICE identifies in the import process that a company address already exists and just adds the new contact person to this address.
| Wichtig: While importing addresses these will be assigned to the owner group that the user importing these addresses has selected in it`s Profile at the field for the "Address input default groups"! If nothing has been selected here, all the addresses will be imported without an owner group, which means that these can be accessed by every other user. If you want to make certain addresses only avaiable for some users then you might have to split your addresses into multiple imports and change the owner groups into the Profile before each single import. |
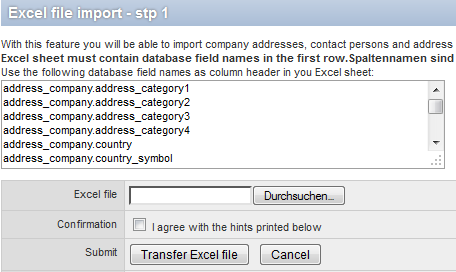
Excel file import Step 1

Screenshot: Overview of the column titles useable in the import and the selection of the import file.
Please select now your file that you wish to import containing your address data. The file needs to be available on you local hard drive or network. Please klick on "Search" to select you file. Before you can continue you need to confirm the Checkbox "I agree with the hints printed below". Now you need to click on the button "Transfer Excel file" and the fiel will be uploaded to the WICE server. Depending on your file size this can take a few minutes.
| Hinweis: If you want to import notes to be addes to an address, the date format in your import column "note.holdfile_date" of your Excel sheet needs to be in the format YYYY-MM-DD. The field "note.eomployee_assigned" needs to contain the database-ID (employee.rowid) of the employee to whom the holdfile needs to be assigned. So that Excel will accept this format it might be necassary that the column format needs to set to "Text". |
Within the next step WICE will let you now how many sheets your file contains.
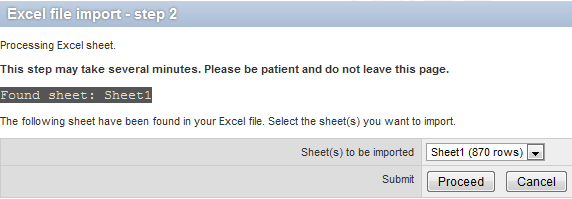
Excel file import Step 2
WICE now shows you, after having uploaded and analysed the file, how many different sheets it contains. If there are more then one sheet in your file you will have to select which sheet you want to import and it is also shown how many lines each sheet contains.
Please select the sheet to be imported an click on "Proceed."
Excel file import Step 3
WICE now analyzes your Import-file and shows you the column titles that have been recognized:
Multiple identical column titles in your import sheet can be merged and optionally specifying a divider. It is not necesary to include all the supported column titles in your import sheet. But it is mandatory(!) that the first company address category (address_company.address_catrgory1) is present and filled with content.
| Hinweis: If you want to assign an address to multiple address categories, e.g. an address in address company category 1 needs to be "Customer" and "Partner" you will need to add separate columns in your import sheet for each category entry that you wish to assign. |
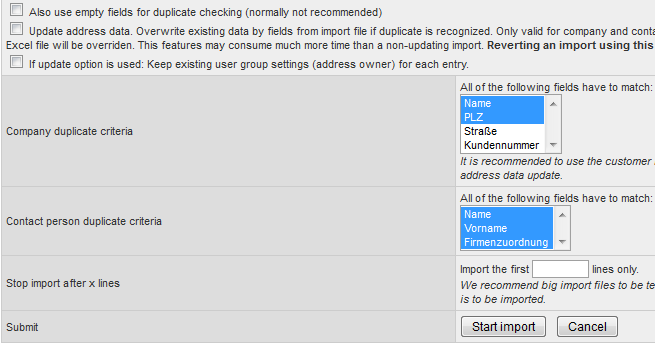
WICE performs a duplicate check which each import. Hereby additional values can be added to an address or values can be overwritten with informationns from the import sheet.

Screenshot: Select here the desired settings for the duplicate check and the number of lines to be imported.
You can select through the corresponding options whether the address fields should be considered in the duplicate check if there values are empty or if existing data from duplicates should be overwritten. By selecting these option values of found duplicate addresses in your system will be overwritten by the values in your import file.
Next you can select the fields to be included in the duplicate check. Therefore you will have to click on the fields listed in "Company duplicate criteria" and in "Contact person duplicate criteria." The selections in these fields are linked as "and"-combinantions which means that each single criteria needs to match exactly to be defined as a duplicate.
Furthermore you can decide how many lines of your import sheet should be imported. For this purpose you need to fill in the number of lines in the field "Stop import after x lines." By using this option is it possible to limit the number of lines for validating and testing of your import sheet. If you want all lines to be imported just leave the field blank or insert a "0".
Now click on "Start import" to start the import.
| Tipp: Please test larger import files and your settings first by uploading just a few lines for your sheet by using the option "Stop import after x lines" to make sure that the data is consistent. |
Excel file import Step 4
Now your import will be carried out. On the screen you see a list of every single line that is imported. If no more new lines are added, the import is finished or if the number of lines imported matches the total number of lines of your import sheet.
According to the importlog shown on the screen you can check for every single line how the import has handled these. If an address was detected as a duplicate you will see the remark "already exists" for this line. If now a new contact person was added the remark "inserting contact person..." is added. In case that all the addresses in your import file have been detected as duplicates of course no new adresses will be added to you system.
| Tipp: The information displayed in the importlog can`t be again accessed later on - therefore we recommend to save the contents of this screen via copy & paste e.g. in a text editor if necessary. |
| Wichtig: Please note that there is no message shown if the import is finished when the last line of your import sheet is shown in the importlog. So we suggest to check and remember in Step 2 of the Excel import of how many lines your import sheet consists. If the the import log reaches this number the import is finished and you can close this screen to check in the Addresse module if your import was done correctly. |
Revert Address Import
To revert an Adress import you have to click on the button "Revert previous database state" on the bottom of the screen of Step 1 of the Excel Import.
Please note that an Import can only be reverted within 24 hours and only if you haven`t selected the import option to update any address data!
Click now on the Button "Revert previous database state" and the follwing screen appears if not one of the exclusions mentioned above are applicable:
From the drop-down menue you can now select the import that you want to revert. Then you will have to activate the checkbox to make sure that you really want to revert the import and then you have to click on "Revert previous database state". All the imported data will now be irretrievably erased. In any case please also note the further remarks on the screen! If you need to revert any other previous imports please follow as often as needed the same steps again.
Explanation of the available column titles for your Excel file
As such the column titles needed from WICE to match the contents of your import sheet are self explanatory. We have nevertheless collected all the available fields for you with a brief explanation. In your excel sheet all the column titles need to be in the same line but it is not necessary to use all available column titles in your import sheet.
| Column Title | address_company.address_category1 | address_company.address_category2 | address_company.address_category3 | address_company.address_category4 |
|---|---|---|---|---|
| Explanation | Company Address Category 1 | Company Address Category 2 | Company Address Category 3 | Company Address Category 4 |
| Column Title | address_company.country | address_company.customer_number | address_company.delivery_address | address_company.fax |
| Explanation | Country (Company) | Customer Number (allocated automaticly) | Delivery Address (no longer supported) | Fax-No. (Company) |
| Column Title | address_company.line_category1 | address_company.line_category2 | address_company.name | address_company.number_of_employee |
| Explanation | Line Category 1 | Line Category 2 | Company Name | Number of employees |
| Column Title | address_company.p_o_box | address_company.phone | address_company.remarks | address_company.state |
| Explanation | Company P.O. Box | Company Phone | Company Remarks | Company State |
| Column Title | address_company.state_pobox | address_company.street | address_company.street_number | address_company.suburb |
| Explanation | Company P.O. Box State | Company Street | Company Street No. | Company Suburb |
| Column Title | address_company.town | address_company.town_area | address_company.town_pobox | address_company.turnover |
| Explanation | Company Town | Company Town area (engl. Addresses) | Company Town P.O. Box | Company Turnover |
| Column Title | address_company.url | address_company.zip_code | address_company.zip_code_pobox | |
| Explanation | Company URL | Company ZIP-Code | Company ZIP-Code P.O. Box |
Column Titles for contact persons:
| Column TitleFeldname | address_contactperson.address_category1 | address_contactperson.address_category2 | address_contactperson.address_category3 | address_contactperson.address_category4 | |
|---|---|---|---|---|---|
| Explanation | Contact Person Address Category 1 | Contact Person Address Category 2 | Contact Person Address Category3 | Contact Person Address Category 4 | |
| Column Title | address_contactperson.birthday | address_contactperson.email | address_contactperson.fax | address_contactperson.firstname | |
| Explanation | Contact Person Birthday | Contact Person Email | Contact Person Fax | Contact Person First name | |
| Column Title | address_contactperson.mobile_phone | address_contactperson.name | address_contactperson.phone | address_contactperson.phone2 | |
| Explanation | Contact Person Mobile Phone | Contact Person Surname | Contact Person Phone | Contact Person Phone 2 | |
| Column Title | address_contactperson.phone3 | address_contactperson.position | address_contactperson.private_street | address_contactperson.private_town | |
| Explanation | Contact Person Phone 3 | Contact Person Position | Contact Person private address street | Contact Person private address town | |
| Column Title | address_contactperson.private_zip_code | address_contactperson.remarks | address_contactperson.salutation | address_contactperson.serial_salutation | |
| Explanation | Contact Person private address ZIP-Code | Contact Person remarks | Contact Person Salutation | Contact Person Serial Salutation | |
| Column Title | address_contactperson.title | ||||
| Explanation | Contact Person Title |
Columm titles with an explanation to import/add notes to addresses:
| Column Title | custom.* | note.contactperson | note.employee_assigned | |
|---|---|---|---|---|
| Explanation | Custom field | Note Contact Person | Note employee | |
| Column Title | note.holdfile_date | note.holdfile_time | note.medium | note.priority |
| Explanation | Notiz Holdefile date | Note holfdile time | Note medium (Category) | Note priority |
| Column Title | note.task_done | note.text | note.time_exposure | |
| Explanation | Note Task done (0/1) | Note Text | Note time exposure |


