Projects
Inhaltsverzeichnis
- 1 Projects
- 1.1 Selecting existing projects
- 1.2 Creating new projects
- 1.3 Creating project tasks
- 1.4 Project templates
- 1.5 Editing project tasks
- 1.6 Project tasks (employee overview)
- 1.7 Exporting project tasks
- 1.8 Project tasks (monthly overview)
- 1.9 Project tasks (daily overview)
- 1.10 Task detail view
- 1.11 Task feedback
- 1.12 Timer
- 1.13 Adding new task feedback
- 1.14 Chart view
- 1.15 Subprojects
- 1.16 Transfering task calculations to tickets
Projects
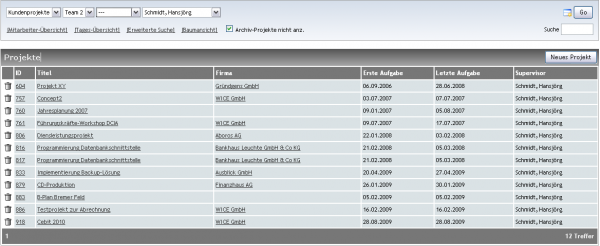
Using the module "Projects", you can create and manage all your projects. By Using the existing projects filters you can easily create lists of specific types of projects E.g. of projects of a specific employee. You can also transfer projects, that are finished, to the archive. But you can of course still search through your archived projects if needed.
| Tipp: Each project has a unique project ID. It can be used as a search criterion. The ID is automatically assigned to each project when you create it, and can not be changed. |
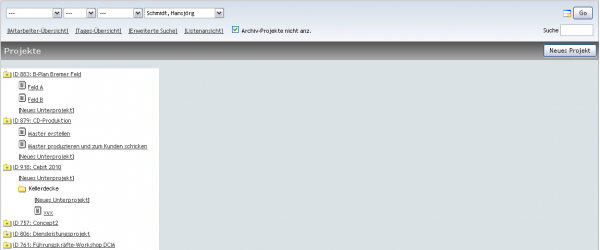
Archived projects will also be displayed when you turn off the check box "Hide archived projects " and click on Go. You can optionally choose to display the project list in a tree view or the default list view. To change to the tree view click on For this purpose click on [Tree view]:
To display all folders of a single project in the tree view, click on the desired folders. Click on the project title or the task title to go to get to the detail view of each project or task. If you want to close the folder again, click on the matching folder icon again.
To get back to the list view, click on [List view].
With the search feature, you can search by the project title or company name. If you click on "advanced search", you will receive further search options.
You can now also search by the task title, task description, task feedback and the project title. A list of your search results will be displayed. Click on the project title or the title of the task, to enter the detail view of the project or task.
Selecting existing projects
To select an existing project, click once with the mouse on the desired project title. Go immediately to a window to the overview of the corresponding project tasks.
600px
Screenshot: Task overview of a project
Creating new projects
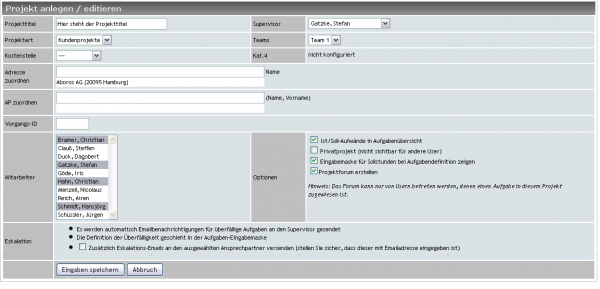
In the "Projects" module, click on new project. Now appears the mask to create a new project.
Enter the title of the project, select the project categories and the supervisor of the project and select the check boxes about the options that you want. You make the optional address and contact person assignment, if not already done, the interactive search fields. Specify accordingly in the field "address assign to" the name of the company and WICE will represent appropriate results right here. To join, just click on the desired name.
Then proceed analog in the allocation of contact - the contact person for the project must be kept not at the selected address, but can be applied at a different address as the contact.
If you created your project on the task link, the address and the corresponding process ID is already registered. You can change the operation, in which you simply enter a different ID.
If the supervisor to get task completion confirmations by E-Mail, select the check box. Any feedback and also when creating or editing a task, the supervisor will receive an email from the system.
Would you enter planned hours for the task definition, you select the corresponding check box. In the wake of the task definition prompted now to enter the desired hour for each employee.
The project Forum is a discussion forum, which is created in the module "CommCenter" and is used for the exchange of the project participants. The Forum can only be accessed by users, which is assigned to a task in this project.
WICE escalation management automatically sends notification e-mails for tasks if they are overdue over the planned period. These emails are automatically sent to the project supervisor and if you select the check box to the specified contact person of the project
Finally, click on "Save" to create your project.
Now you will see a new mask to define your individual project tasks - the project task overview.
In this window, you can add or edit new or existing tasks for the project, edit the project and delete, and shift the project, and replace employees in project tasks.
| Hint: Please note that you can move only projects and staff to replace, if you already have established at least 1 task. |
Creating project tasks
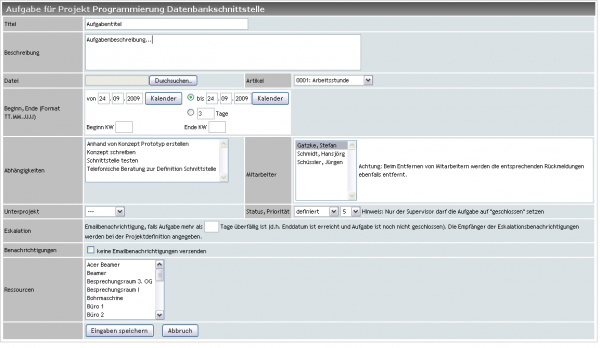
To define a new project task, click on New task. The mask to define the task opens.
Enter title and description of the task. You also have the option to upload a file from your hard drive or network. Now you enter the time span for the project task - the begin and end date. -You can choose between calendar dates or the duration in days or weeks.
If you want to associate this task with an article, so select the appropriate item from the list. Please note that the project article extra are defined by the administrator as such in the article Manager.
You can also define dependencies this task to other existing items, you select the tasks in the question holding the [CTRL] key pressed depend their completion of this task. Should there be shifts in the task period, WICE will automatically adapt the dependent tasks.
Now assign the employees of this task involved. You can optionally assign (the sub-project must be applied before) the task a subproject. In addition, set a status and the priority of this task.
You can set after how many days, the supervisor of the project and a possible point of contact will receive notification emails of the escalation system. If you enter nothing, no emails are sent for this task.
Escalation emails are only sent if the end date is exceeded and the status is "not completed". The recipient of this email is used in the project definition.
| Hint: When you assign yourself to a project task, then you will not receive a separate email notification. These will be only sent if other employees are selected to work on the task! |
Now press "Save" to add your new project task. Now enters a window to determine the amount of work for each employee, if you have set this when you create the project.
Now give this task set hours for each employee. On input, then click Save. If you have linked this task with an article, entering here is valid for the number of articles.
On the Eraser, you can delete individual project tasks. You want to edit the entire project, so click Edit project. In the status bar the name of the employee is specified next to the status you, having made the last response to this task. No name is displayed even no feedback is done.
| Important: Please note that you can delete only projects and tasks and edit these if you have the necessary rights to do so. Please also remember that you can not undo a deletion. |
Project templates
By using the features
- Copy project,
- Shif project and
- Replace employee
you can create project templates.
Copying projects
To copy an existing project, first select the desired project in the project browser and click it. Then go click on the button Edit project. Here you will find now the button copy project. Therefore, a copy of the selected project is created and stored as a copy, what is indicated by the modified project ID.
![]()
Screenshot: Copied project and original in the project browser differ only by the different project-ID
Shifting projects
To move the selected project, click "Shift project". This function moves all tasks of the project to a new start date.
You can set a new start date for the project now - all the tasks of the project, starting with the date for the first task will to be moved accordingly.
When finished click on "Shift project" and your changes have been applied and the task overview appears again.
Replace employee
To replace one or more employees within the project, click "Replace employee". With this function, you can replace the selected employees in all tasks of the project.
You will see the listing of all employees who got assigned to one or several tasks in this project – you can now replace each of these employees with another from the list. At the end of input, click Save. Get back to the task overview of the project.
Editing project tasks
Want to edit a project task, click the task you want to edit "Edit". The task, enters the window to set. Make your changes here, and click input store.
If you so have pre-set this appears again in the window to determine the amount of work. Also click Save on inputs. You return again to the project task overview.
Project tasks (employee overview)
In the list of the project tasks list view, click on a listed employee in the same column. You will automatically reach the project tasks (employee overview) for all projects:
600px
Screenshot: Here you can see the taks overview of each employee
About the list boxes, you can the projects by date, status; Sort priority. To select only certain task statuses or a specific staff member, use the drop down menus, and then click Go.
The projects, related tasks, the hours for this already made, as well as the current status and the processing time is displayed here at a glance.
Exporting project tasks
You can export the selected tasks from the task pane as a CSV file. To do this, click [export] with the right mouse button and select the file to be saved on your local hard drive or network.
Project tasks (monthly overview)
You have here the possibility to view a detailed monthly overview of the individual project tasks of selected employees. To do this, click "Monthly view".
600px
Screenshot: Monthly overview of all task feedback of the projects of an employee
You can see the assigned projects and project tasks, the status, and the hours entered in the table per month divided per project and in days. To change the employees or the period, according to select this from the selection fields and then click go!.
Click on the projects or tasks for further processing. Direct access to the "Projects" module.
Project tasks (daily overview)
If you want to display a total daily overview of all employees, click on [Daily overview].
Get a window with a current daily report here.
600px
Screenshot: Total day overview of all employees to the projects
To receive this report, also via the button in the main window of the module "Projects". Select the desired date, as well as the validity of the date picker. Available: task period date message See all employees, their task to be performed, provided feedback, and the time required.
Task detail view
In the item overview of a project in the task column, click the remote installation task, how to get a window to display the task details, and to get feedback about the project task. If you just want to give feedback, then click directly on the status of the task.
Here you see all this project task important details. You want to edit this item, click Edit item. Have to delete you from this task, so press Delete task.
Task feedback
In the feedback tab, you will see all feedback sent to this project task the employees involved in the task. You have to read way status messages to the project tasks, but also to itself a message to emit. The project supervisor automatically receives an email notification about a new message.
600px
Screenshot: Overview of the task feedback for a selected project task
The feedback is sent to the project task of each employee, with an indication of hours already worked and remaining, as well as the files stored if necessary for a feedback here at a glance.
Timer
By using the [start timer] feature, you have the possibility to run a stop watch at the beginning of the task editing to automatically record the processing time. In stop or pause the task, click on "Stop timer".
The times per project task are automatically added and currently displayed.
You can run several stopwatches parallel. The stopwatches running even when you are no longer logged in to WICE. You find a link that leads directly to the respective task on your home page, if you use active one or more stop watches to time and attendance.
| Important: Please note that active stopwatches will be switched off automatically after 24 hours at the latest! |
Adding new task feedback
Want to write a feedback to the project task, click feedback in the task details view or on the status field in the task list of the project on new. So then appears on the screen for entering your feedback. The text of the confirmation will be sent after you save the feedback to the supervisor of the project by E-Mail if you do not manually deselect this selection.
600px
Screenshot: Mask to add a new task feedback on project tasks
Under text, type the description of the status message of any length. Continue to enter the previously applied and will still be restricted working hours for this purpose. Enter the date and, where appropriate, select a new status for the job. You can also attach a file to your feedback. Now click Save on inputs. You will automatically reach the overview of feedback back.
Chart view
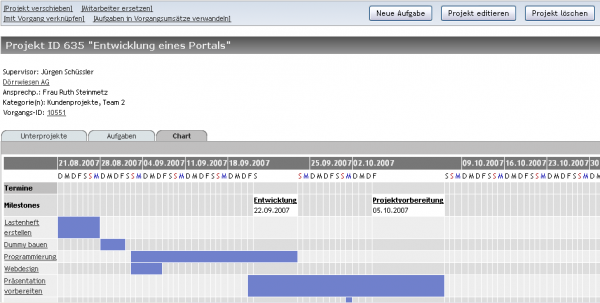
You can display a chart view of the project by clicking on the Chart tab.
The milestones indicated in the description resulting from the subprojects. Click on a job title to go to the detail view. Click on a milestone to reach the respective subproject. The vertical, orange bar shows the current day. The last date in the top row shows the end of the last task. A date is marked with a red dot. Appointments are charged to a project about the calendar.
Subprojects
By creating and defining subprojects, you can structure your entire project. As a result, you can provide your project with so-called milestones. To create or edit your subprojects, click the subprojects tab in the project task overview.
Creating a subproject
Click new subproject. You enter the mask for the creation of a new sub project.
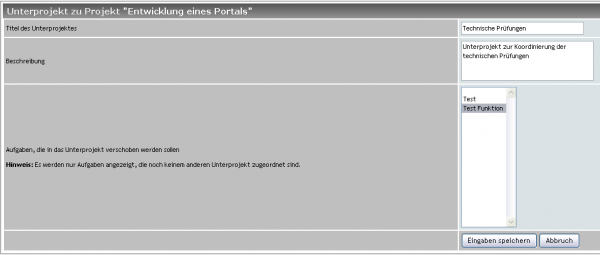
Type a title for the new subproject. It appears later in the overview of the subprojects, as well as in the chart view of the project as a milestone. Then, select the tasks that should be transferred or mapped in the subproject.
| Hint: Please note that only tasks are displayed that have not been associated with any other subproject. To be able to assign a task to a subproject, it must at first been created! |
Now click "Save". Your new sub project is automatically added to the list of subprojects. The order is here based on the temporal sequence of tasks of the subproject.
Editing subprojects
Click on "edit" and enter the mask for the attachment of the subproject. You can add new tasks or deselect existing tasks. On input, then click Save.
Transfering task calculations to tickets
You can convert project tasks calculations to ticket process chances (opportunities). More details about opportunities you can find here: Tickets
Click on [Transfer task calculation to ticket] to Enter the mask for the conversion of the tasks
600px
Screenshot: Mask for transfering task calculations into opportunities at a ticket
Here, select the appropriate item from the list. You can choose whether the hours or be rounded off because only full hours can be converted. Also select the calculation basis. Here, you can choose whether the confirmed expenses or the calculated efforts should be recognized.
| Hint: Please note that only tasks can be transformed where a project article was assigned and only within project that were associated with a ticket! |
Then click on Convert selected tasks. Go to the overview of the process opportunities. The converted tasks appear as current opportunities with today's closing date.
