Tickets
Inhaltsverzeichnis
- 1 The definition of a ticket in WICE CRM
- 2 Ticket = digital folder
- 3 Tab Ticket
- 4 Tab Notes
- 5 Tab Chances
- 6 Tab Workflow
- 7 Creating a new ticket
- 8 Editing tickets
- 9 Ticket overviews
- 10 Searching through tickets
- 11 Ticket statistics
- 12 Print Preview
- 13 Deleting a Ticket
- 14 Creating a Project from a ticket
The definition of a ticket in WICE CRM
We like to think of a ticket as a - rather today regarded quite old school - folder but with a more digital, modern and integrated background, where all related information about a sales or support or any other form of request is organized and archived - together with the documents, emails or offers that you or other employees in this ticket created, sent or received.
| Hint: Processes organized in an ticket follow the principle of"Action" and "Reaction" and thus are no planned projects! |
Example 1: a customer calls you with a a problem or question, and you respond.
Example 2: you acquire a new sales lead and try to win him as a new customer.
All steps in these different processes are included within the ticket, getting thereby organized and archived - together with the documents, emails or offers that you or other employees in this ticket create or receive.
| Important: You will use most likely a lot of time with the tickets and their features within the WICE CRM. Please keep in mind that a ticket is always associated with an address. Through the ticket-based work process, you create automatically a complete and consistent customer history. |
Ticket = digital folder
You can imagine a ticket like a digital folder in which everything is contained and available that has to do with the specific ticket. You have also the main instruments available, which you will need for working with the ticket. In the ticket, among other things, you can:
- Phone logs or other information like
- himself/herself or others create reminder
- Dates set
- deposit any documents (files)
- Write letters or faxes about documents templates
- Email write or deposit
- Enter sales opportunities
- Write offers, order confirmations, delivery notes, invoices
- standardized workflows invoke and ticket
... and more.

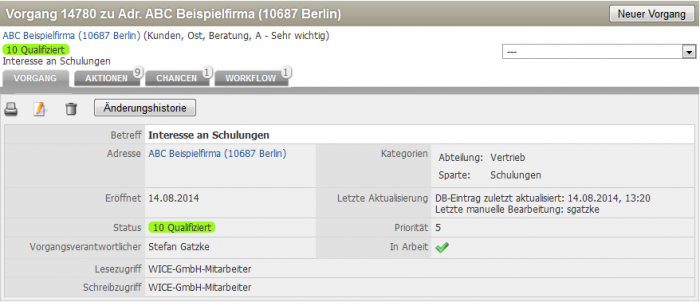
Screenshot: Detailed view of an ticket with the Cavalrymen of ticket, events, opportunities, and workflow
Tab Ticket
In the tab ticket are all basic informations of the ticket displayed:
- to which address the ticket was assigned - the address is directly linked with the ticket.
- if an optional billing or delivery address was selected
- who created the ticket and what is the current priority
- Status of the ticket
- Subject of the ticket
- Tickt supervisor - the responsible employee for the ticket
- all selected category's for the ticket
Tab Notes
Ticket notes with their hold files and further options are probably the most important tool in your daily work. Here you can create hold files with reminders for yourself or your employees, notify them about your latest actions, attach files or create new appointments. From here, you can also directly write emails or create documents that will be stored directly in the ticket as new note. For any more information about the features please click here Ticket Notes
Tab Chances
In this tab you can manage all your sales opportunities related to this ticket - you can use these for creating offers, and when an order is received, for all the further accounting opportunities on a ticket. You can create your individual article-specific offers, invoices, delivery notes etc. directly in WICE. All items added here as opportunities can automatically be evaluated in the sales forecast and chances list in the sales module. For any more information about this features please click here: Chances
Tab Workflow
In this tab, you can assign and execute the available for this ticket. The opportunity to use workflows for a ticket offers you the possibilty to standardize your processes, unify them and get a better grasp for the progress of a ticket. You can within a workflow automatically create ticket notes, with or without hold files, create emails using templates and create new chances for your opportunities. It is also possible to change the ticket status, branch a workflow and also assign other workflows within an already existing one. The integrated graphical display of the workflow progress provides a better traceability of the single workflow steps. Click here to learn more: WICE Workflow management
Creating a new ticket
A new ticket can be created from the module tickets and also at the tab tickets in the detail view of a company address.
| Hint: We strongly recommend to alwaye create a new single ticket from the tab tickets at a company address. By choosing this way you do not only save the subsequent step to assign the ticket to an address but you will also get the overview of all actual tickets assigned to this address. |
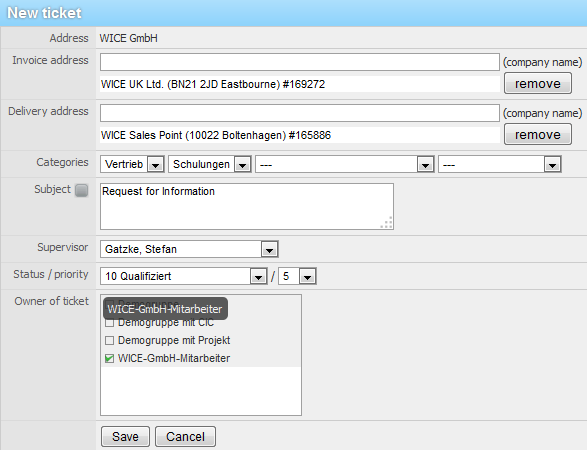
To create a new ticket, click the button New ticket. The form to enter a new ticket will appear:
If you want to add a different invoice or delivery address for this ticket as the address associated directly with the ticket, you enter them by using the search box and choose the desired address from the list of your search results.
Assigning the available ticket categories helps you to determine what kind of ticket it is. With this feature you can e.g. specify if it is internal, a sales related or a support ticket, or whether you want to assign this ticket to a particular campaign. These ticket categories are helpful when creating campaigns or generating ticket based reports.
For more information about adding or editing the available ticket or any other categories please click here: Categories
In the subject field, you enter the reason or aim of this ticket, according to labeling an digital folder, so that other employees can easily comprehend what this ticket is about. The subject field is mandatory to create the ticket.
| Tipp: Use a descriptive subject and keep in mind not to make it too long. The subject is also automatically added as the editable default text for a title in a chance based document as invoices or offer templates and the subject field can be searched directly via the search field in the ticket overview in the ticket module. |
Each ticket must be assigned to a ticket supervisor as the responsible employee, who takes care of the progress of this ticket which does not mean that he is the only employee working on it. Each ticket can only have one ticket supervisor. A ticket can be assigned at any time to another employee. Ticket notes or hold files can be assigned to any other employee within a ticket.
By choosing between 1 and 10, you can select a priority. Keep in mind that you have to define whether 1 or 10 is the highest priority! You and your colleagues should communicate this clearly in the company which is the highest priority. The priority can of course change during the life cycle of a ticket.
| Hint: The available status and the categories for the categorization of a ticket is done in the administration and are are freely definable. Keep in mind that you will get a fast, diverse and meaningful tool by using the filter options available if these are set up and used accordingly. |
Depending on whether you are member in more then one rights group, you can then specify which rights group you want to select as the ticket owner, and thereby define who will able to have read or edit access to this ticket.
| Hint: If no rights group has been selected, the default group from the user profile is automatically applied. Keep in mind that if no rights group is specified here or in the profile of the use who enters the ticket, it will be accessible by all other users who have the general right to read or edit tickets! |
Editing tickets
To edit an existing ticket you will have to go to the ticket note overview and click on the tab "Ticket" and click here on the Edit-Button. The edit form for this ticket appears. You can now make the desired changes to the ticket subject, priority, supervisor or owner of the ticket and also remove a previously assigned invoice or delivery address by ckicking on the remove button at the respective fields or assign new one`s. You also have the possibility to change the ticket status here. To do so select the desired status out of the list. To save your changes finally click on Save.
Ticket overviews
Select the "ticket" tab in the details view of an address to see all tickets linked to the specific address:
By activating the checkbox "Show closed tickets" also archived tickets, assigned to the closed ticket status, will be displayed.
This list of tickets for an individual address shows the following columns:
- the status of each ticket with their assigned color codes
- the Date when the ticket was created
- the ticket subject + the individual ticket ID
- the amount of sales, costs and profits for all opportunities of a ticket
- the assigned employee who is responsible for the ticket.
Overall ticket overview
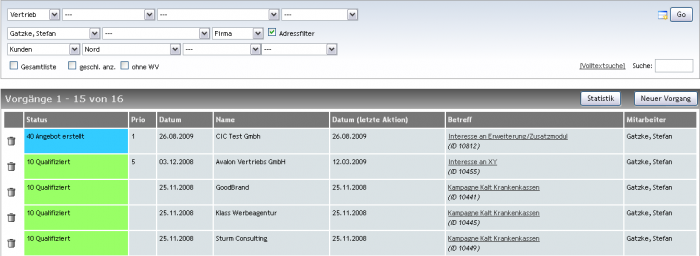
An overview of all ticket on all addresses available is in the "Ticket" module. The ticket module is the control center for your ticket control. You see at a glance the desired ticket with an indication of
- Status with color coding
- Priority
- Date when the task was created
- Name of company address
- Date of last action in this ticket
- Subject of the ticket
- responsible employees.
You can select ticket by categories and display. Above the list boxes have the opportunity to select - depending on how you've set up your filters. After assignment of the categories, click on go.
Via the selection menu, you can search the ticket
- Staff
- Task status,
- the decorated ticket categories 1 to 4
- furnished Adresskategorien 1 to 4 (selectable option via checkbox)
filter.
About check boxes, you can display a complete list of selected ticket without scrolling, include closed ticket in the selection ticket, and track ticket without reminder.
| Tipp: You can use to create new ticket in the ticket overview. It is however recommended to specify ticket via the addresses. |
In the subject column, click a desired ticket, this will take directly to the overview of the actions of this ticket.
Searching through tickets
A further selection can be done through the word search. Enter a term in the input box of search and click on "Go". The entered word now searches in date, name and subject. You can search by a ticket-ID, by simply entering the ID in the search box.
A full-text search over all tasks, notes, and task actions is the optional plugin WICE plugin notes and ticket search possible.
Ticket statistics
Do you look at a ticket statistics to all ticket or actions, so you click in the window to the ticket statistics. Enter now the statistics overview. Statistics are separated for ticket and actions.
You have to restrict the ability to display tasks by specifying periods and selecting the filter from the task pane. To change the sort order, click the title of each column, then the display changes accordingly.
In which you change to actions with the list of ticket go to the action statistics. You have to restrict the ability to display actions by selecting the media filter.
Print Preview
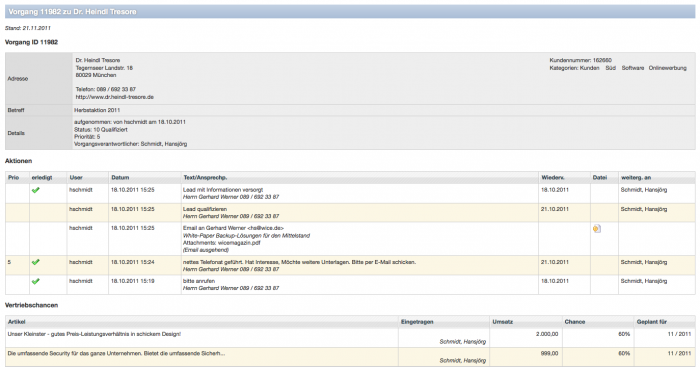
Can a selected ticket complete with details of all stored data in see a print preview. Include the address, ticket overview including all actions and the deposited associated sales opportunities.
Now, choose the print function of your browser (for example, by CTRL + p) from and you can print this information before you make a customer visit or go to a meeting.
Deleting a Ticket
You want to delete a task, so press the delete ticket. This please keep in mind that you can undo no longer a deletion! You will receive a confirmation prompt. Are there, click OK. The ticket is now deleted.
Creating a Project from a ticket
You can associate an ticket with a new project. To do this click on "create project". So in mask appears to create a new. From now on will be in the action overview the linked project appears and a link to this ticket will be shown in the project.


