Ticket notes: Unterschied zwischen den Versionen
(Die Seite wurde neu angelegt: == What are ticket notes == The notes tab is the main operational area of WICE CRM in a ticket, and at the same time also the chronological documentation of all process...) |
|||
| Zeile 35: | Zeile 35: | ||
{{hint|The Hold files will create a list of to-do's which are set on a specific date until they should be done. Please bear in mind the hold files are not be used for appointments, which are supposed for reals appointments at scheduled time.}} | {{hint|The Hold files will create a list of to-do's which are set on a specific date until they should be done. Please bear in mind the hold files are not be used for appointments, which are supposed for reals appointments at scheduled time.}} | ||
| + | |||
| + | === Ticket note === | ||
| + | If no hold file is necessary and you want to add something just for information and complete this note there is no need to specify a date. | ||
| + | |||
| + | === Appointment === | ||
| + | If you want to create a real appointment that will also be added to the calendar you select the date for the appointment in the input field as described for the hold file above. Then you add the time in the input field in the row "Appointment" and select the date category. A new appointment is added in the calendar and is automatically associated with the address and the ticket. | ||
| + | |||
| + | === Assigning a contact person === | ||
| + | You can either select a contact person from the pull down menu list quick selection (these are the contact persons of the address that this ticket was assigned to) or in the AJAX search box: type the first few letters of the last name and WICE will then automatically display the best matching results. Now click on one of these names and it is automatically associated as the contact person for this ticket note. | ||
| + | |||
| + | === More options === | ||
| + | With these options you can define whether the note is already done or if you want to receive an email notification when the hold files was completed or if no notification is send to the responsible employee to whom this note/ hold file was forwarded. | ||
| + | |||
| + | You can inform other employees about your latest actions here by mail by selecting the employees from the list. The employees that were selected for a notification will also appear in italic in the ticket note under the employees assigned to this note. | ||
| + | '''Please note that the list of the employees for additional notifications appears only when you assign the follow-up to another employee as yourself or disable the 'no email notification' checkbox.''' | ||
| + | |||
| + | In addition you can attach any type for file to this note. To do this click on "Browse" and select the file in question. | ||
| + | |||
| + | To save your inputs click on '''Save'''. The ticket note appears automatically in the notes tab of the ticket. Click on the edit button at the ticket note to return to the editing window of the note to make any changes. | ||
| + | |||
| + | === Other features === | ||
| + | |||
| + | If the ticket note was created you can close the hold file to mark it as done, by clicking in the column "Done" on the button with the "X". The action is then marked with a green hook as completed and is no longer displayed in the list of your hold files in your dashboard. | ||
| + | |||
| + | === Writing an Email === | ||
| + | If you now want to write an E-Mail or create a document to the assigned contact person, then you have to click on the document / email button. When you click on the email button it is either linked to your local E-mail client or of the E-mail client of WICE. You can adjust the setting which email client is linked with this function in your profile! | ||
| + | |||
| + | {{Screenshot|neue_email_erstellen.png|400|Mask to create a new email}} | ||
| + | |||
| + | When you create the email the WYSIWYG editor is available which allows you to create your email as in a word processor and for example adjust the font size (see screenshot) or change the font color or insert bulleted lists, etc. So you can already see how the email will arrive at the recipient. In addition to attachments which you can attach to the email directly embed in the email as an image. | ||
| + | To do this you have to select the attachments first in the order that you want and then click on the tree icon in the options bar for the formatting. | ||
| + | |||
| + | It will open a Pop-Up window where you can select which attachments you want to include in the mail as an image. You can select the position of the image in the text itself: if you have integrated the image by clicking on the button "Add" in the email you can then position the placeholders in the text at the desired location. | ||
| + | |||
| + | Below the input field for the email text you have the option to select up to five attachments to be added to your email. If 5 attachments should not enough we recommend to attach the files as a zip file. So you have an option to send an unlimited number of files as attachments. | ||
| + | |||
| + | {{Tipp|In every email that you send you can optionally and in addition to your regular email signature add a sender info line with your name, your photo and your position (in the company). These will then be preceded in the layout of the email. To do so activate the corresponding checkbox "Include full sender info (with name, picture and position)". Please note that to use this feature an image file must be defined in your profile settings.}} | ||
| + | |||
| + | To send an email to the recipient with the highest priority select the corresponding checkbox "Send mail with highest priority". | ||
| + | |||
| + | To see a preview of your email click on the button '''Preview''. To finally send the email, click on the '''Send mail''' button. | ||
| + | |||
| + | When you send the email with WICE then it will automatically be added with it`s attachments as a new ticket note. | ||
Version vom 26. April 2013, 15:43 Uhr
Inhaltsverzeichnis
What are ticket notes
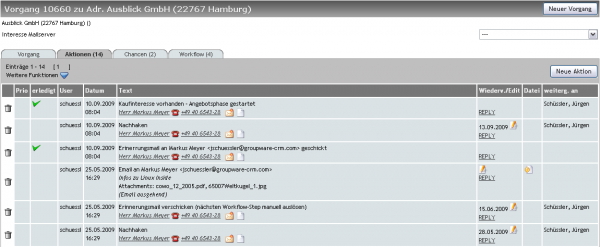
The notes tab is the main operational area of WICE CRM in a ticket, and at the same time also the chronological documentation of all process actions are mapped here. From here, you can
- create reminders for yourseld or other employees,
- add phone logs, visiting reports, or any other documents,
- create appointments,
- write and send E-mail messages,
- write and send letters, faxes and other documents optionally sending them directly using the fax.de plugin.
- make phone calls per click with the optional CTI integration.
Creating ticket notes
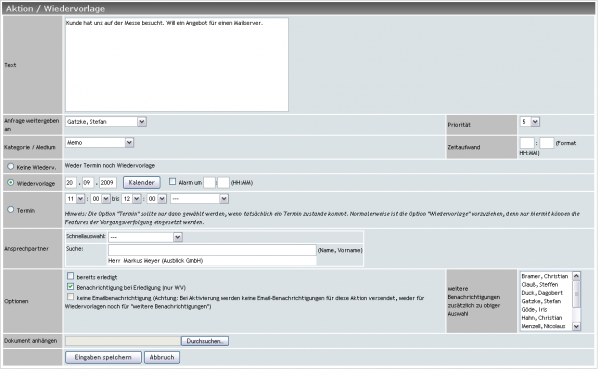
To create a new ticket note, click on the button New ticket note. You will now see the mask to the Create of a new ticket note.
Note text
Here you will type the text of the action/follow-up. Choose from the list of employees the desired recipients, to which this note should be forwarded. In addition a priority can be set and a media category to define the type on which way (fax, letter etc.) this note has emerged or needs to be forwarded can be specified. This media category can later be also used as a filter option to fine all notes with this category.
Assigned employees
Here you select the employees for which you want to create the reminder/hold file or to which you want to forward the task. Your own employee is here pre-selected by default.
| Hint: If you are selected as the recipients of the hold file the check box to send additional email notifications is automatically disabled and the list where to select other employees to send out notifications is not displayed. Only if you select other employees than yourself or clear the check box for further email notifications will display the employee list in the box for "additional email notifications". |
Time expenditure
In the field "Expenditure of time" you can enter the time required for this note. These will be added to the total time spend for this ticket and will appear at the foot of the note overview of the ticket and can be optionally transformed into an opportunity.
Creating a hold file
If you want to set up a scheduled call enter the desired date or use the miniature calendar feature to choose the date. A current overview of the monthly calendar will be displayed. Click on the desired date and your selection is applied automatically in the calendar field.
The hold file will then appear for the selected employee on the list of the hold files in the dashboard.
| Hint: The Hold files will create a list of to-do's which are set on a specific date until they should be done. Please bear in mind the hold files are not be used for appointments, which are supposed for reals appointments at scheduled time. |
Ticket note
If no hold file is necessary and you want to add something just for information and complete this note there is no need to specify a date.
Appointment
If you want to create a real appointment that will also be added to the calendar you select the date for the appointment in the input field as described for the hold file above. Then you add the time in the input field in the row "Appointment" and select the date category. A new appointment is added in the calendar and is automatically associated with the address and the ticket.
Assigning a contact person
You can either select a contact person from the pull down menu list quick selection (these are the contact persons of the address that this ticket was assigned to) or in the AJAX search box: type the first few letters of the last name and WICE will then automatically display the best matching results. Now click on one of these names and it is automatically associated as the contact person for this ticket note.
More options
With these options you can define whether the note is already done or if you want to receive an email notification when the hold files was completed or if no notification is send to the responsible employee to whom this note/ hold file was forwarded.
You can inform other employees about your latest actions here by mail by selecting the employees from the list. The employees that were selected for a notification will also appear in italic in the ticket note under the employees assigned to this note. Please note that the list of the employees for additional notifications appears only when you assign the follow-up to another employee as yourself or disable the 'no email notification' checkbox.
In addition you can attach any type for file to this note. To do this click on "Browse" and select the file in question.
To save your inputs click on Save. The ticket note appears automatically in the notes tab of the ticket. Click on the edit button at the ticket note to return to the editing window of the note to make any changes.
Other features
If the ticket note was created you can close the hold file to mark it as done, by clicking in the column "Done" on the button with the "X". The action is then marked with a green hook as completed and is no longer displayed in the list of your hold files in your dashboard.
Writing an Email
If you now want to write an E-Mail or create a document to the assigned contact person, then you have to click on the document / email button. When you click on the email button it is either linked to your local E-mail client or of the E-mail client of WICE. You can adjust the setting which email client is linked with this function in your profile!
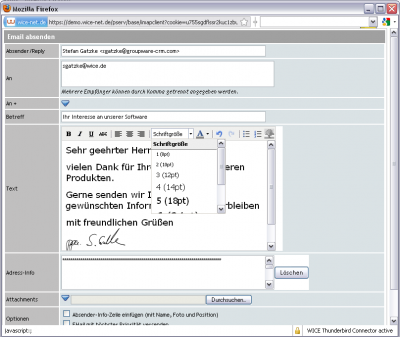
When you create the email the WYSIWYG editor is available which allows you to create your email as in a word processor and for example adjust the font size (see screenshot) or change the font color or insert bulleted lists, etc. So you can already see how the email will arrive at the recipient. In addition to attachments which you can attach to the email directly embed in the email as an image. To do this you have to select the attachments first in the order that you want and then click on the tree icon in the options bar for the formatting.
It will open a Pop-Up window where you can select which attachments you want to include in the mail as an image. You can select the position of the image in the text itself: if you have integrated the image by clicking on the button "Add" in the email you can then position the placeholders in the text at the desired location.
Below the input field for the email text you have the option to select up to five attachments to be added to your email. If 5 attachments should not enough we recommend to attach the files as a zip file. So you have an option to send an unlimited number of files as attachments.
| Tipp: In every email that you send you can optionally and in addition to your regular email signature add a sender info line with your name, your photo and your position (in the company). These will then be preceded in the layout of the email. To do so activate the corresponding checkbox "Include full sender info (with name, picture and position)". Please note that to use this feature an image file must be defined in your profile settings. |
To send an email to the recipient with the highest priority select the corresponding checkbox "Send mail with highest priority".
To see a preview of your email click on the button Preview. To finally send the email, click on the Send mail' button.
When you send the email with WICE then it will automatically be added with it`s attachments as a new ticket note.


