Appointments
Inhaltsverzeichnis
Appointments / Calendar
In the module calendar, you have the possibility to create schedules for yourself and your employees. Depending on the selection, you will see events in days, weeks, months or 3-month surveys for all or only selected employees. All employees have access to the calendar. You can restrict this access to purely private appointments or dates for specific groups of users.
| Tipp: By selecting the desired view, i.e. day, month or 3-month view, just when needed nor corresponding filter settings and then click on "Go", select this view as your default view upon entering of the appointment calendar! |
Create appointments
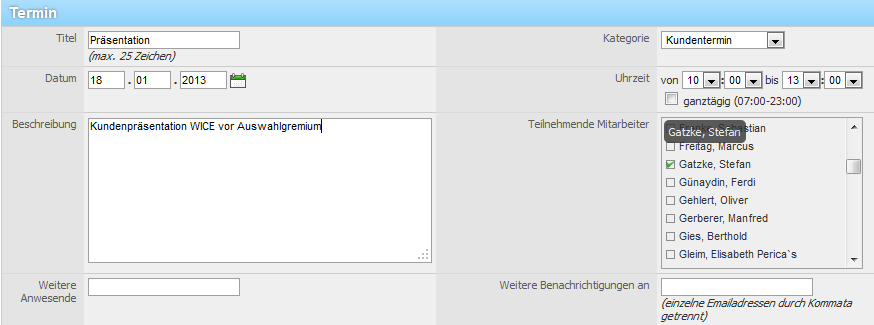
To create a new appointment, click on the corresponding digit of the day. Now WICE opens the input mask for a new appointment.
In the "Title" field, type the title of the appointment. This appears in the calendar view. In the adjacent selection list, select the category of the event. The input field "Date" was added automatically. You can change this manually, or click the calendar and select another day from the calendar. In the "Time" field, enter beginning and end of the appointment. Alternatively, you can mark the date or the date series as a full-time appointment (from 7 am 11 pm). If you activate the checkbox, automatically hides the selection fields for the time and are only available, if you clear the check box.
You can describe in detail the date in the input field "Description". Now select the participating employees from the list. You can invite also all groups at this time. To do this, you select a group from the list of "Participating groups".
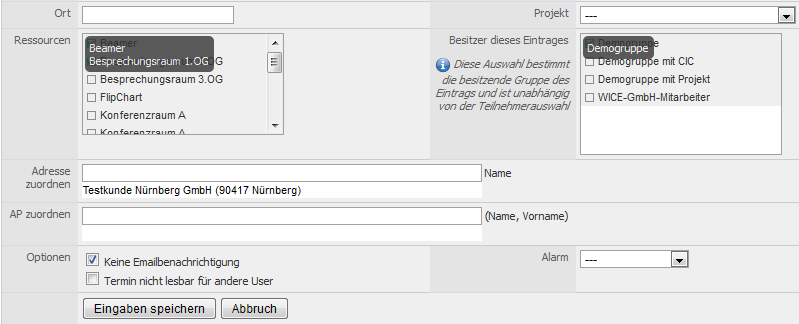
In the input field "Additional participants", you can enter additional participants. If you want to notify other people by E-mail about this appointment, you can enter the email addresses in the input field "Additional notifications". Each email address must be separated by a comma. In the input field "Location" you can manually enter the location of the event, so for example if the appointment takes place at your office or at the location of your customers.
If you want to link this appointment with a project from the "Projects" module, select the project from the list of "Project".
To be linked with this date resources from the "Resources" module, so select them from the list.
In the input field "Owner of this entry", you can set the Group of users who should have access to this date. Depending on the configuration of your WICE system, only the members of the selected groups refer to this date.
Would you like to notify the participants of this appointment not by mail, so please select the check box.
| Hinweis: Please note that if you have chosen this option none of the participants receives a notification about this appointment by email! |
If you want to enable a notification alarm for this appointment, please select the alarm time and activate the check box. In the adjacent drop-down menu, you can choose the standard between a notification message pop-up or email. Optionally, it is possible if you use the WICE-Fax.de plugin, instead of a notification by E-mail to send a (premium) SMS to the mobile phone number that is stored in your profile and the profiles of all the participants, to leave.
Should the date be not readable for other users, enable the check box. In the calendar, then only the user name as the date will be shown.
If an address is associated with this appointment, enter the first few letters of the company name and then click on the desired company name in the given search results. The search results are automatically restricted in accordance with the results in your address database, the more detailed you enter the company name here. Should the selected company not be listed in the results, check the spelling! The same applies to the contact person who should be selected as a contact for this date at this address.
If it is a recurring appointment, select the corresponding checkbox. After saving the appointment you will be prompted to enter the date interval(s) in the following mask.
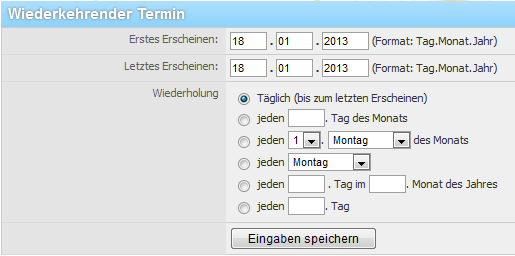
Please enter the first and last appearance of the appointment. Please keep in mind that the date of the first and of the last show cannot be the same, otherwise the date is not being applied. Now, select the type of repetition. Press to save your entries and your date will be transferred into the calendar. Should this occur to collisions with another appointment, you are informed about the WICE system. Change then the appointment, to heal the collision.
Editing appointments
In the appointment overview, click on an existing appointment. You will now see the further details, such as other participants, loacation etc. To further edit, click the EDIT button. The create/edit appointments window appears automatically.
| Hinweis: Please note that you can only edit or delete appointments if you have the necessary rights to do so. Otherwise this option is not displayed |
Delete appointments
If you do want to delete an appointment, click on the trash bin icon. You will receive a confirmation prompt. If you want to permanently delete the date, then click OK. The date is now deleted. If there is an appointment, is the part of a time series, so the following pop up is displayed:
643px
Screenshot: Dialog for deleting of single dates/recurring appointments
You can now select whether the whole date range or only the selected schedule entry or all dates of this series in a determine time period should be deleted. To do so, you must activate the check box and enter the period in the date fields, or click the desired button. Your changes are then taken over or deleted the / the date (s).
Exporting appointments
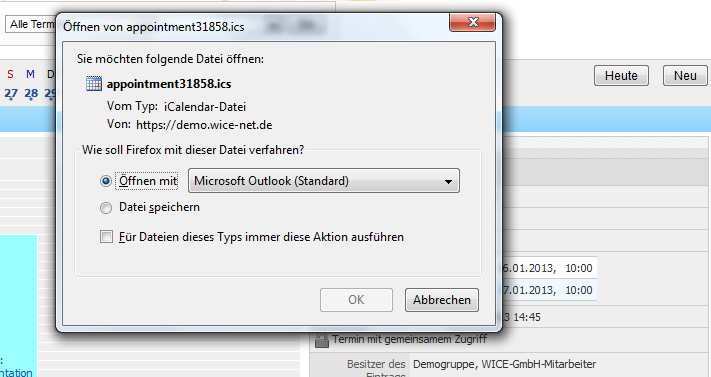
Individual appointments can be exported to the VCal or ICal format to your local calendar management software. This is only possible, if the VCal plugin or the ICal plugin is installed in your WICE client and your user group has the required privileges. Only then the VCal/ICal icon is displayed for the selected date. By clicking on it, it opens a dialog which allows you to decide how the appointment file in the format depending on the operating system setting for .vcs /.ics files:
Typically, you can select whether the file should be stored locally on your hard drive or directly added in the desired or with the file format.vcs/.ics associated application.
Visiting reports
You will see here an overview of all generated visiting reports for appointments that were created from tickets notes.


