Campaigns
Inhaltsverzeichnis
Campaigns
With the campaign module, you can create address lists. These are used as the basis for your marketing campaigns and the address export. From here, you can create mailings and send, export addresses, manage or create new address lists, templates as a template, and assign existing address lists to a new address category. Through the campaigns tab, entering a list of already created campaigns.
Address lists
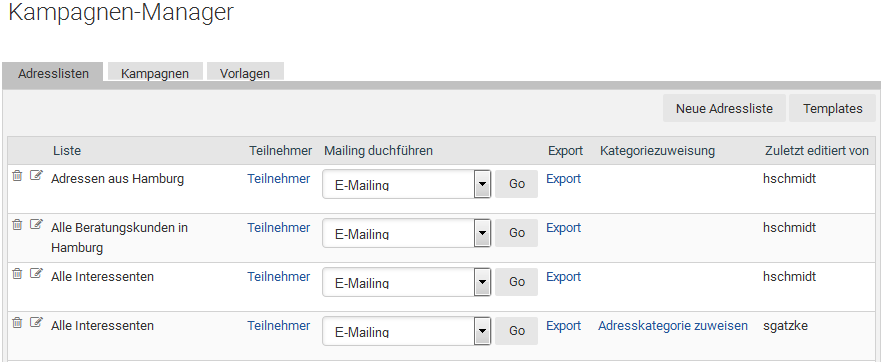
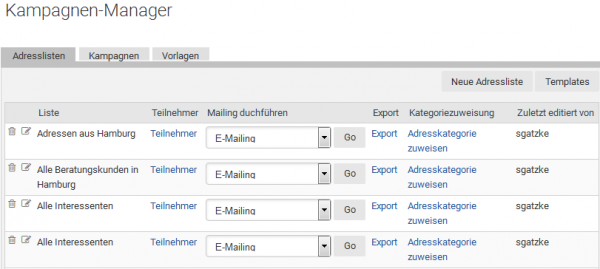
You see, when you enter the campaigns module, first an overview of all existing address lists.
In this window you can click on the Edit button Edit an existing address list, by clicking on the link "Participants" to display a list of participants of the selected address or directly generate a mailing, export the selected addresses, and assign the selected addresses of a new Adresskategorie. You will also see from whom an address list was created or last edited.
| Tipp: Wenn the description of the contents of the address list to see this view, you can simply go with your mouse pointer to the column list at the desired address and it opens a small window where the description will be shown. |
Creating an address list
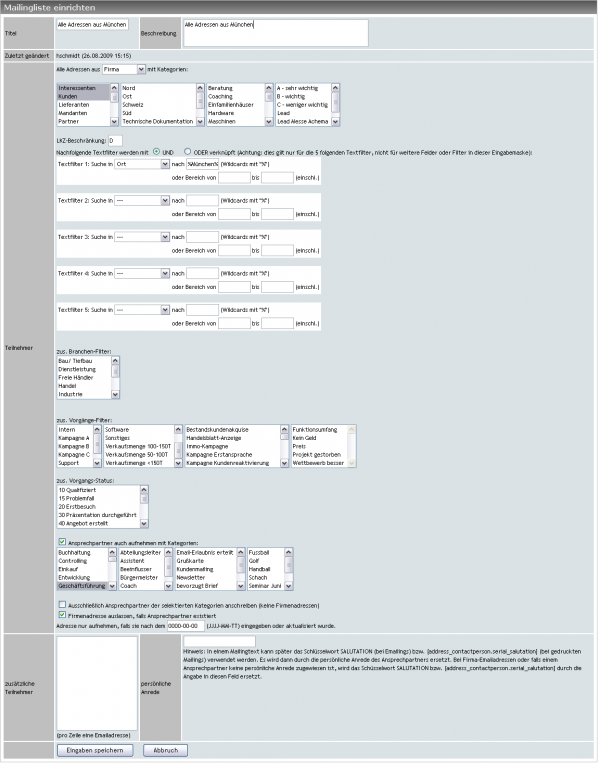
To create a new address list for the addresses existing in WICE, click the button "New address list", and it appears the following view:
This fairly extensive mask looks, if you create a new address list first significantly more compact, since you first of all need to enter a title and a description, so that other users can follow it´s content. Then a selection of the address type is required for this list, according to the type of addresses your list should contain.
| Wichtig: You must provide a title for your address list, because you otherwise not can call them for a post-production or running a campaign. |
You choose to do so now among participants from the list box, which addresses in question (company employees) come. This is important, because this different types of addresses and other categories in the system for those addresses have been entered. As soon as you have made your selection here, expands automatically to see the mask as shown on the screenshot in this example for the selection of "Company". The selection of "Employees" is used to create an internal mailing list for a mailing to your under the address stored addresses staff at WICE. If you so want to create an address list for your business contacts, so customers, partners and prospects, etc., then you need to select from "Company".
Now start the actual selection, select the addresses by selecting the address categories. You want to further restrict the addresses you can do so via the another text filter. You can do this through the logical operators and / or link.
If you do want to reduce this selection on certain branches, you will have to select these trough the branch categories. Here only the first branch category level is available for a selection.
In addition, you can select the ticket filters. Then only addresses are adopted, for which an existing ticket with the corresponding categories is availabel. Hereby you can create address lists E.g. for certain types of actions.
In addition to the categories of operation you can record with optionally also still only operations, which have a specific task status. In this field, a selection is possible with multiple ticket statuses.
If you want to also include the associated contact persond, then activate the check box Include contact persons: and then select the desired categories.
| Wichtig: If you do not activate this checkbox only company addresses will be contained in your list but not individal contact persons! |
You also alternatively have the option to only contain contact persons in your adress list and not the associated company addresses. To do this, select the check box "Only select contact persons from the selected categories, do not include any company address".
Optionally also the possibility automatically in the collection to allow a company's address and write to only the contact person. You will have to activate the check box "Only select company address in case of missing contact person". This option is useful if you have many entries in your address list, where no contact persons are available or you are not certain, and the addresses in any case should be contained in your address list.
Further, you can limit the addresses that will be contained in your list only towards addresses that have been added or edited beyond a certain date. To do this, enter a date in the format YYYY-MM-DD in the input field. For example, 2000-01-01 for all addresses that were added beyond the 01.01.2000 or edited after that date.
Looking for additional participants (such as yourself) insert these in the field for additional participants. Enter an E-mail address per line. Printed mailings will not respect this input.
Title personal in the entry field enter a text, which is inserted if the contact no series letter salutation is present, I.e. "ladies and gentlemen". So you can later use the keyword SALUTATION (in the case of e-mailings) or [address. full_salutation] use (in the case of printed mailings) it is then replaced with the personal title of the contact person. With company email addresses or if no personal title is assigned to a contact person, the keyword SALUTATION is or [address. full_salutation] replaced with the information in this field.
Save press input and your entries are stored.
Editing an address list
In the list of your address lists, click on the Edit icon with the list you want to alter and you will then enter the edit mask of the address list and you can make your changes. After you have made your changes click on Save.
List of recipients
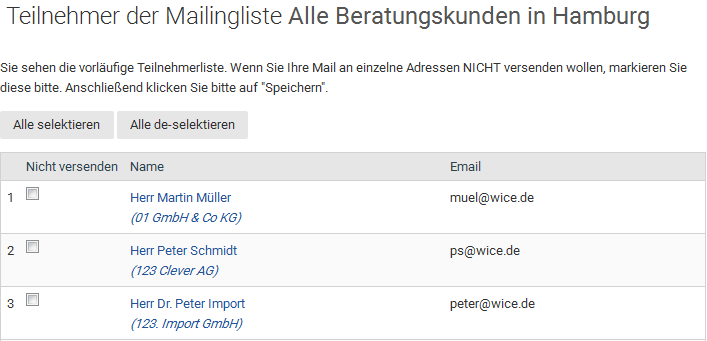
By having a look trough the list of recipients for an address list you can to control your selection of all included addresses.
You have here now individual addresses by participating in a mailing from sand to exclude the possibility of or on the respective buttons "all select" and "all de-select" to make that then manually add or can agents, in which you click the checkboxes for the entries a corresponding preselection. The entries in the list are linked directly to the companies or the stored contacts, so that you can edit the categories of the participants in this way to permanently remove them from the selection.
So, you can quickly detect whether an email address is stored at the selected participants at all by the display in the column email and if necessary to maintain this, if you are planning to e-mailings at this address list the shipping.
| Wichtig: When in the administration of your WICE client "more settings" check the box "select" do not send valid for export "(mailing lists)" is enabled, so be here made settings for the export. This does not apply to the function of assigning of address categories in terms of campaign |
| Hinweis: Contact persons that are marked as "deactivated" do not appear in the recipients list and are also not exported! |
Adress export
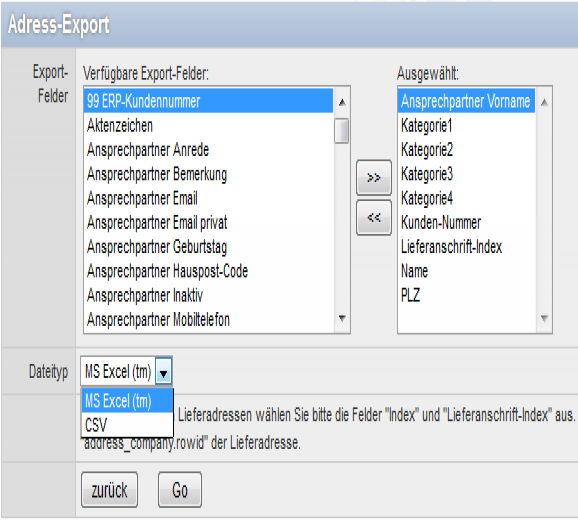
Want to export the addresses maintained in WICE, click at the desired address on "Export" and appears in the export screen. Addresses are exported either in the so-called CSV format or in Excel format. These formats can be processed in all major systems or use for a re-import your WICE clients, if you want to perform an external processing of addresses.
| Hinweis: If the column for the adress export in the overview of your adress lists is not available to you, then you have not permission to access this feature. Please check with your WICE administrator about the options. |
Please also note that may be on the list of participants disabled participants are not exported, if this is configured in the administration of your clients.
In the selection box on the left side you find an overview of all address fields that are available for export available. Now, you select with a mouse click which these input fields in your export file you want to apply. Each of the desired input fields run over by clicking the > > button in the left panel. You should notice that you make a mistake in your selection, then can the records of the < < also deselect the button.
| Hinweis: Please select from the fields 'Index' and 'delivery address ' index export shipping addresses |
Now, you can still determine what format the export should be, whether as a CSV file or as an Excel file.
| Wichtig: Principle therefore only addresses contained in the Adressexpot which noted Grupppenrechte - are there in your import file to which you have access, so have read! |
To do this, click Go, and your export file will be generated. This can take a little according to number of fields or complexity of the selection. WICE automatically assigns the order of the columns to display from left to right in the export file.
If addresses which you have excluded from a list, should not, be exported then must you, or a user with admin rights, in administration, in the point "the checkbox more system settings" "select"do not send"(mailing lists) valid for export" enable.
Creating an Emailing
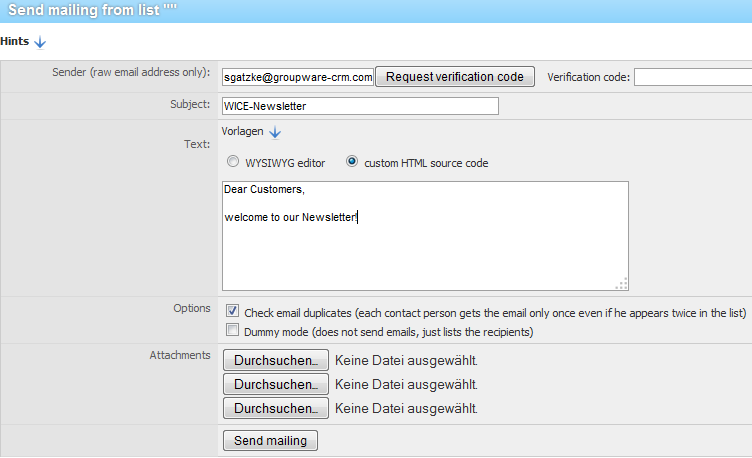
Would an E-mailing to a certain address list send, so select E-mailing the question list from the drop-down menu. Then go to input mask for the body of your emails.
| Tipp: We generally recommend to send out emailings in the HTML format or the usage of the integrated content editor (available since WICE X5) with it`s Wysiwyg functions to create and send your emails! |
The E-mail address of the sender is taken from your profile. You can change this to any other E-mail address, so that the answers from undeliverable or incorrect emails will not be sent to your individual mailbox. But please be aware that you need access to the inbox of this email adress in order to use it!
| Important: In the Sender field only the "raw" email address of the sender can be used! No special characters or other information are allowed! |
Now add a meaningful subject in the subject line.
In the text input box, enter the text of your mailings. The SALUTATION keyword can be used in the text. It is replaced with the personal title of the single point of contact, or through the for this address list greeting deposited, if no mail address for the address or the contact person has been deposited.
| Hinweis: With the keywords REMOVE_FROM_MAILINGLIST_LINK and REMOVE_FROM_ALL_MAILINGLISTS_LINK these links can be used in the text of the email automatically, with which the recipient independently of the used mailing list or from all mailing lists can remove. This is equivalent to setting the send check box in the attendees list. This feature only for corporate/AP-mailings and not for mailings to employees is available If a recipient of the mailing list via this link logs out, then unsubscribe is retained even after the change to the mailing list. For this link to work, the "base URL", so the address of your server, must be configured. |
| Tipp: In a text newsletter simply add the keyword to the desired location. In a HTML newsletter insert a full link in the HTML source code in the desired location. The format looks then like this: <ahref="REMOVE_FROM_MAILINGLIST_LINK">To unsubscribe from this newsletter.</a> |
Under options, you have the option to set whether to send the E-Mail in HTML format, and with the highest priority, or whether you want to use only the dummy mode, where you get a list of the recipients and no mail delivery.
Please keep in mind that not all mail clients HTML mails can process and many users have turned off this option in the mail client for security reasons. They receive only HTML code.
| Hinweis: Please note our special chapter about HTML-Newsletters |
You can also check the box "Duplicate check make email addresses based on (several times there is an AP, it is written to only once this)" enable, which prevents a multiple dispatch to the same email address.
Please also note that the period for submitting may take up to several hours depending on the number of participants of an address list. Please do not cancel the connection or not to close the mask!
Finally, click submit to E-mail to all participants.
The E-mailing is now sent to the addresses stored in the address list. Then WICE loops through the database and indicates the end of the sending addresses.
| Wichtig: The percentage indicated when the emails are generated is not the actual level of the send process of the emails! Although not 100% are displayed here if necessary, send an email to all valid participants in the address list is sent yet! |
Creating a printed mailing
Would you like to send a printed mailing to a specific address list, so please select 'printed mailing"at the appropriate address list. An overview of existing templates (templates), which are linked to this address or an address type (company/employee) appears now.
Select a desired template and click document create. Want you yet at the same time save a note to the address of each participant for this purpose, activate the checkbox save individual documents as Adressnotizen. The document should contain so-called custom variables, the entry fields for the custom variables here will be displayed and can go directly to WICE filled are. Save the document now then. The generated documents are provided now to download, so that you can print out and send.
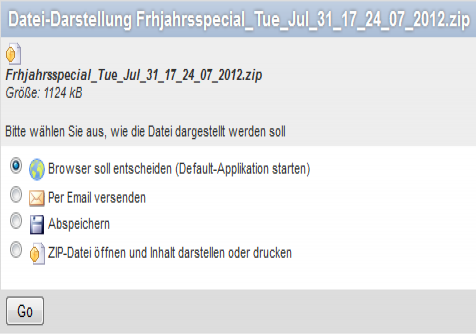
If you have installed the media Assistant plugin, then get the following view:
You can now either call your default software for manipulating ZIP archives, or you can send the file via email or save them. For a direct representation of the ZIP archive and a collection PDF printing, choose the option "open ZIP file and content display or print" and each then click "Go".
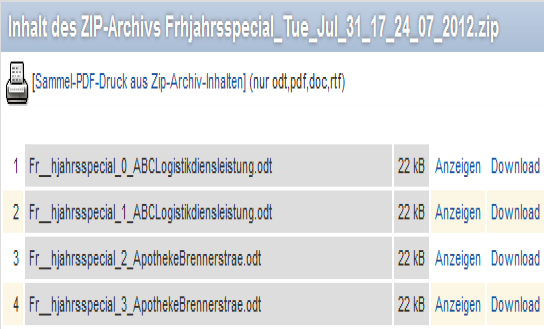
To display the following window with the overview of the individual documents in the ZIP archive:
You can now individual documents via the link in your document either out or download. Alternatively, you can create a PDF file via the function [collection-PDF printing from ZIP archive content] from all containing documents which then provides a composite print in a document all individual documents. Just directly, click the link. Depending on the installed version of the word processor installed on your WICE server, there may be limitations in the conversion of the formats. Should be the desired file format not listed, please contact your WICE administrator. Please keep in mind that generating the PDF file may take several minutes depending on the number, size, and format of the single documents during the conversion.
| Tipp: By using the Fax.de plug-in that is freely avaialbe to all customers, you can send your printed mailings as fax mailings or by automated mail, as so-called iLetters, "paperless" directly through WICE. Shipping is handled completely by our partner Fax.de - precondition is that you register using the plugin as a customer of Fax.de. Resulting costs for your documents sent by fax or iLetter provided to you directly by Fax.de |
Campaign management
See an overview of all already done mailings in terms of address lists in the Mailings tab.
You see the name of the address list and in the column document archive at printed mailings of the used template name or a link to the from the printed mailing generated ZIP file with all participants to view documents.
Also see the the type of mailing (printed or e mailing) and the date and time of sending, and the user name of the person who triggered the mailing.
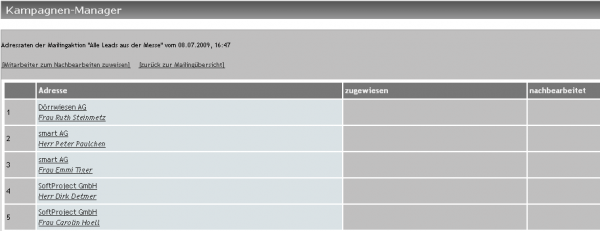
By clicking on the name of the address list appears in the list of participants of the mailings.
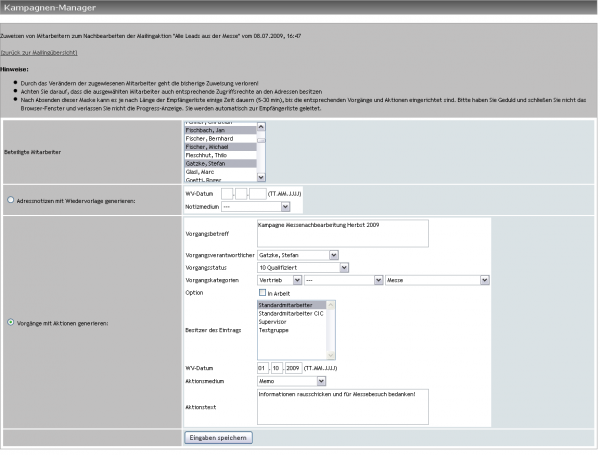
Now click "Assign staff to PostProcess". From the list of "Co-workers", choose the appropriate employee.
Now you should choose whether to post processing Adressnotizen with a resubmission or operations should be generated with an action. This selection applies to all addresses and is automatically created for the selected employee.
In a note, you must enter only the resubmission date.You can select also a note media from the list.
Want to set up operations, please enter a subject for the operations and choose a responsible employee. This employee is responsible for all operations to create what but not must mean he edited it entirely alone.
Further you can now decide the status of the operation and the categories and whether the operation as "at work" should be displayed. About the owner groups, you select which user groups to be owners of the new operations. This controls the access rights to these operations. Please note that you can select only groups, in which the previously selected employees are members.
Then, you give even the date of the first resubmission, action medium, and the activity. Then click Save settings.
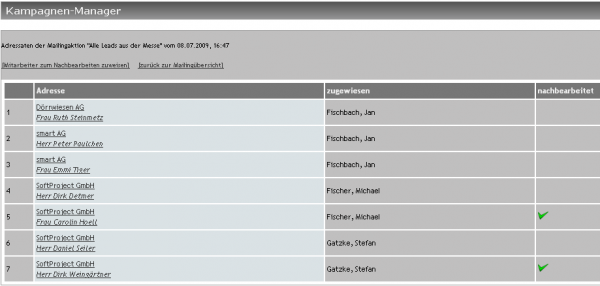
In the overview of the mailing action involved, you will now see the assigned employee.
Whether the employee has completed the resubmission, you see later in the column "processed" in the form of the green check mark. At any time, you can replace the employee at a later date, however, the previous assignment is lost by changing the assigned employee!
Creating templates
Templates are the templates for printed mailings or individual documents that you can create from an operation to an action out. To create new templates or to edit existing templates go in the area of the address lists and click on templates.
You can see an overview of the existing templates. By clicking on the "Source", you can open an existing template in your face or but can change the settings of to previously stored templates by clicking the Edit icon. In General, templates are created in your locally installed face to then here to upload them. Save your templates as RTF or ODT file. The input fields to use in the templates you find, where on the button Template helper click. Now click new template.
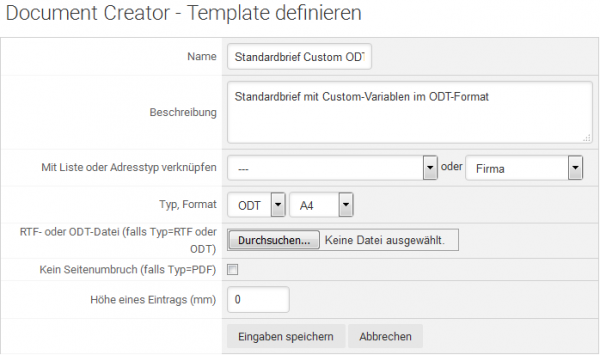
You will now see the mask to the template upload. Type name and description of the new templates here. You can link this template with a list or a specific address type.
| Hinweis: Please keep in mind that if you want to include a template for creating documents from the address type "Contact" or "Staff", then other variables in the template for the address etc. must be used - for more information about this, please refer to the Template helper! |
To assign to a list, you must first create the list. Continue to select the type of document (PDF, RTF and ODT), as well as the format (A4 or letter).
If you want to define an RTF or ODT Dokumententemplate, then you must have created beforehand according to local the template in your word processor. Now click on Browse... and select the document. On input, then click Save. Your created template will be displayed in the overview and the users to be used in the operation or for mailings according to the selected settings are available.
Assigning address caegories
You can assign these addresses this feature for all addresses of an already established address list, a new address category. This may be a category that already exists or can set up also a completely new category in this context here.
| Hinweis: Please also note the changes for the assignment of the address category here are effective only for addresses where you have as a user's editing privileges. Furthermore, the category assignment applies only to address lists no contact selection |
First at the desired address in the respective column, click on "Assign address category":
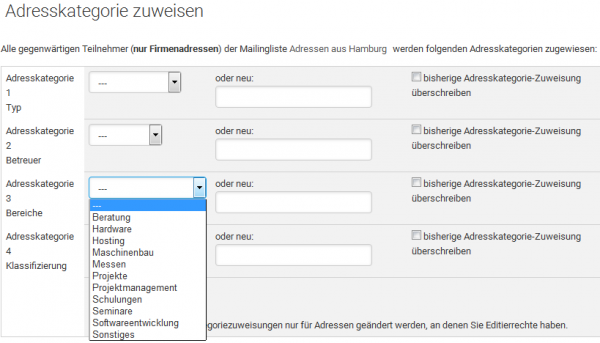
Then you will get to the following view:
In this view, you can assign a new address catergory as a common selection criteria for all addresses of your selection in the address list selected (only companies addresses!). Here you can choose, from already established categories that you can select from the drop-down menus of the available address categories or if you want to set up a new category in one of the available categories.
Optionally you can choose "override existing address category" by activating the checkbox whether the previous categorization should be overwritten by the new selection. The usage of this feature should be first considered carefully!
To apply your changes, finally click on 'Go'.
