Chances
Inhaltsverzeichnis
What are chances?
While under with the ticket notes in a ticket essentially the contact management is carried out, WICE CRM provides the chances of a holistic management of the opportunity (generate, manage, weights, taxes and distribute opportunities) with integrated order processing.
Opportunities/Chances
In the tab you can create your sales chances (opportunities) a prospective customers or customers with a probability of closing opportunities. This opportunity management is part of the sales control. All opportunities are evaluated in the module Sales on the sales forecast.
Order processing
On the basis of the created sales opportunities, you can in the organize here also the whole process of order processing. It is possible to create documents of order processing such as offers, order confirmations, invoices, delivery notes, etc. directly from the opportunities. These documents are automatically stored in the operation as an action. Planned sales opportunity and made sales can be displayed in the module Sales and evaluated.
Opportunities overview
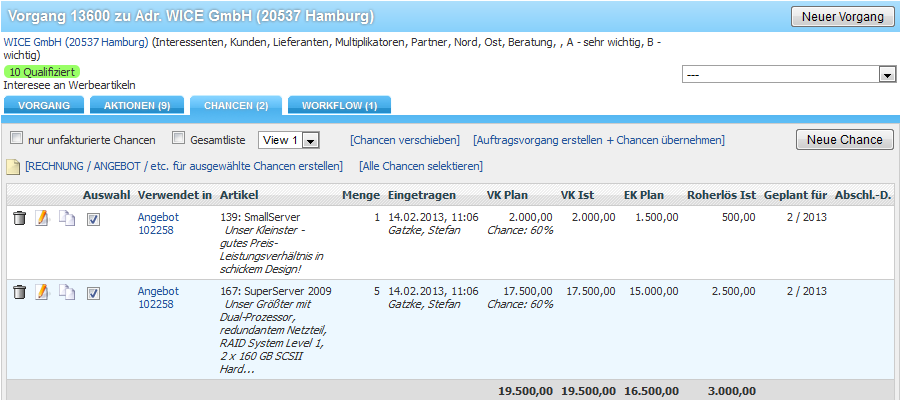
Click on the tab get an overview of the opportunities in this process chances in one operation.
A chance always refers to an article. In the overview, you will see the current status of all opportunities in one operation. In the column "used in" all documents of the order processing are per chance (quotes, invoices, delivery notes...) displayed in which the respective opportunity appears. A complete document history is depicted in this, per chance.
| Hinweis: A chance has a completion date, this means that an order or an order has been granted for this opportunity. The chance is then incorporated into sales reports. The completion date is usually not the same as the date of the invoice. |
Creating opportunities
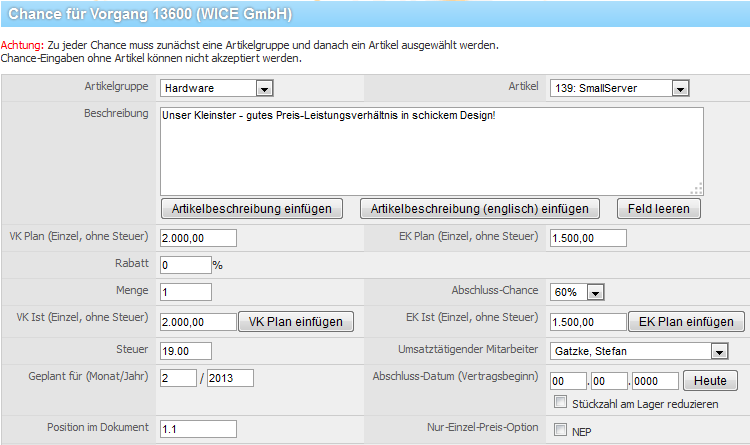
Click on the button "New chance". Enter the mask to create a new opportunities.
Select the article needed for the chance from the category and then article.
In the description field, you can store more information about this opportunity, also in the document generation (quotes, invoices,...) be used. Click on the button "Insert item description" can be used the information in the article root as template and edited. Click on the button "Insert item description (English)" the English description of the item in the item master are inserted. With the button "empty box" you can empty the box again.
| Tipp: The description input box lets you create individual texts for your quotes, invoices, etc. as article Description. |
The input fields
- Sales price (w/o tax)
- Purchase price (w/o tax)
- Actual sales price (w/o tax)
- Actual purchase price (w/o tax)
be automatically after selection of the article with the values stored in the article root filled and are freely editable in a chance.
The discount is automatically calculated from the difference between plan of Sales Price and the Purchase Price. You can either
- enter the Sales Price and enter the discount and the system calculates the Actual Sales price
or
- You enter the Actual Sales price and the system automatically calculates the discount.
| Hinweis: Please note that mandatory for a takeover of the price to print documents the field Actuals Sales Price must be filled. |
In the "Quantity" field, enter the planned quantity of items to be sold a. In the input field "Probability", select the estimated probability of the sales. Now enter the planned sales Date in the field "Planned for (MM/YYYY)" and if the order is already present you can add this information in the "Actual sales date" fields. Select an employee in the employee field to assign the employee that has achieved the sales. Your entries for the month is associated with this opportunity for the sales forecast in the module Sales.
| Hinweis: In the input field "Position in the document", you can create an outline in the documents. You can E.g. use a numbering, integral, as 1,2,3,4... or 1.1, 1.2, 1.3; generate 2.1, 2.2 in the document sections with section titles and section totals. Letters (A, B, C) can be used as an alternative. Details such as 1.) or "2" are not supported. Please also note that if you "no prices for individual items within a section, instead section sum to represent the option" where must choose document generation, then make sure a section title be deposited, so that this function is taken into account! |
Should it come to a successful conclusion or if already a job you have, click on UK copy, and enter the date of the sale in the input field "Completion date (start of the contract)". It is an article from the inventory, so you can automatically reduce the stock of items through the appropriate option.
If you enable the option < b > only-single price-option < /b >, then the articles selected in this chance in the document without total price in the documents is displayed. The price is not a calculated then also in the total amount of the document. The NEP option is effective only in documents that require a payment by the customer!
Editing opportunities
Click on the "Edit"icon ![]() you can at any time edit a chance to complete this example, if you have a job, or to make some changes if you want to edit a range.
If you have made your changes click finally save on settings to incorporate your changes.
you can at any time edit a chance to complete this example, if you have a job, or to make some changes if you want to edit a range.
If you have made your changes click finally save on settings to incorporate your changes.
Copying opportunities
Click to copy a chance when the desired opportunity to ![]() - an identical chance to the same article is appropriately and generated values. They can now edit or use for generating in chance-based documents.
- an identical chance to the same article is appropriately and generated values. They can now edit or use for generating in chance-based documents.
Recurrent opportunities
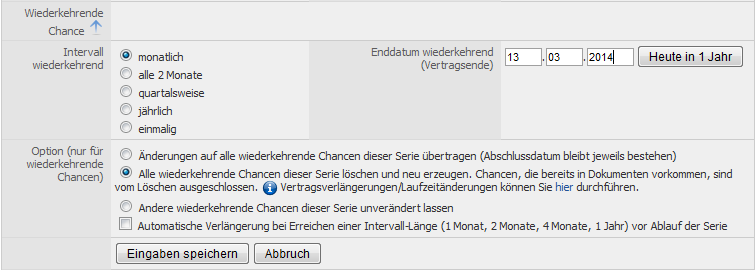
With the function of the recurring opportunities you can for articles that need to be regularly ordered or calculated automatically create opportunities such as monthly fees and maintenance contracts, to allow to automate to the accounting by customers. To convert a scale chance into a recurring opportunity, you must click on the blue triangle next to < b > recurring opportunity < /b > and the mask to the edit or create an opportunity will be extended accordingly.
Here, you now specify the characteristics of the chance of recurring. You initially specify the desired interval, the chance to come back. Then set the date for the end of the contract – Alternatively you can automatically enter a date today in 1 year < /b > button < b > in a year. Now, you can still select, in which you enable the appropriate options, whether the changes transferred recurring chances this series to all, are leaving the closing date each, or whether all recurring chances of this series should be deleted and newly produced. Note, however, the opportunities that already exist in documents are excluded from deletion. This option is automatically pre-selected if you change the class width for the recurring chance! If you want to leave the other recurring chances of a series, so select the appropriate option. Optionally, you can also activate the checkbox to enable an automatic extension on reaching an interval length (1 month, 2 months, 4 months, 1 year) before the end of the series. You can make further adjustments to the recurring opportunities module Sales.
Select all chances
To select all chances of a process for the creation of a document, all the chances just click < b > select < / b > and all chances are pre-selected now.
Creating documents from opportunities/chances
You can create any chance-based documents such as invoices, offers, delivery notes or order confirmations from selected opportunities.
First select the opportunities in the list of defined opportunities, which should be applied in your document, enabling the respective check box at the opportunities and then click "Create document".
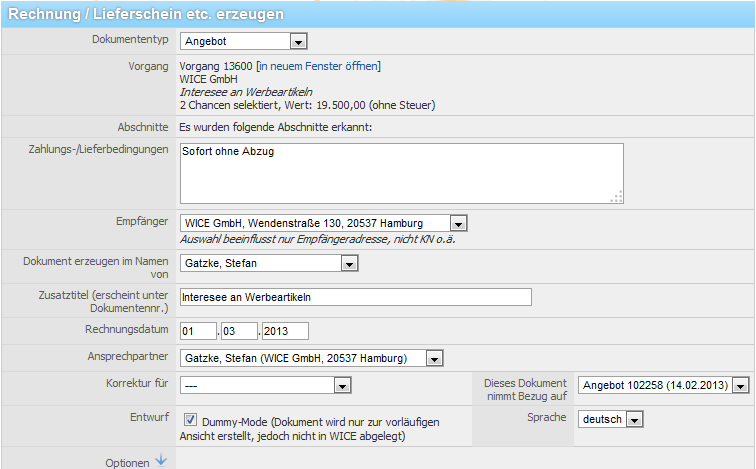
It opens up the mask to create the document.
From the list, select the type of document. Via the link "open in new window" takes you to a new window with the opportunity overview of this operation, easier to make as the settings for the document production, without having to leave this view again.
If you have defined sections, you can now optionally enter the appropriate section title. You can insert additional information into the field for the payment and delivery. The basic data for each document type, created as a rule, already your WICE administrator sets the available document types and managed.
For the receiver of the document, the address of the assigned ticket is selected by default. You can select more addresses if available. These have been created either as a shipping address for the selected address or has been related to this address and are therefore available here as an alternate recipient address.
| Hint: If a P.O.Box address has been added for the address WICE will use this by default as the recipient address in the created document! To avoid this you will have to add the P.O. Box address as an additional address and set up an address relation between these addresses. |
You can also set whether you want to create the document on behalf of your employee's or whether another employee to appear as a contact in the document. To do this, select the employee from the drop-down menu with the list of employees. By default, your staff is already preselected.
| Hint: Please note that to use this function, the types of documents may need to be adapted and must be supplemented by the employee information! Your the WICE administration administrator must configure this. |
You can also enter a text as a title which should appear under document number - the text from the field "Subject" of the corresponding operation is automatically included here. In the statement date field, enter the creation date of the document and, if you want, select a contact person on the customer side.
In the statement date field, enter the creation date of the document. If you use the wild card 'YEAR' when manually assigning document start values, the year of the "Invoice date" field will be inserted here.
If desired, you can optionally select a contact person/addressee filed with this company's address on the customer side from the corresponding pull-down menu.
It involves a correction invoice, so choose in the drop-down menu "correction for" the corresponding invoice out. The same applies to documents which you want to refer to other documents.
In the "Language" field, you can select the language for the document. Note, however, that if you want to create an invoice in English, you must fill out then the field for the payment and delivery terms in the English language. A default language can be set in the Administration for any document already.
With the dummy-mode option is when you click on the button document, create only generates the PDF to view it is not stored in WICE and no data in the tab accounts receivable and payable are entered, or no document number assigned.
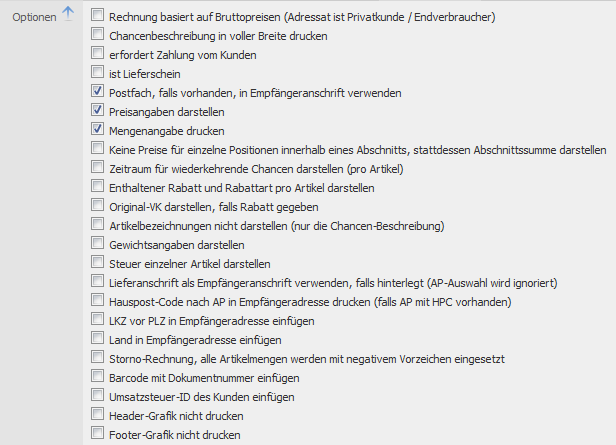
To display the additional options for the invoice generation, click the blue arrow next to the "options" and the mask is extended to:
First, you can select whether the invoice to be generated is based on gross prices. This applies to invoices, where the recipient is a consumer.
The opportunity description should use the entire width of the document and not just the width of the document to select the appropriate option.
Should the amount in the account tab and the OP list be applied to select the option "require payment by the customer".
The option "delivery note" is for delivery. Should any prices are displayed in the document, clear the option.
If you want, no prices for individual items within a section is displayed instead only the respective sum for the section, you must activate this option here.
Optionally you should be represented also the period for recurring chances, if such have been created, per article. Can also display the included discount and the discount type per article, and also whether the original VK is to be represented, if discount is given. You can also choose, enabling this option, when necessary, whether only the description of opportunities and not the article name should be represented.
If the weights of individual items should be displayed, you must enable the appropriate option. The total included tax is listed at the end of the document. To with implementing the tax provide also for each individual article, for this select the option.
If you want to use a different delivery address as the recipient's address, so it must to be deposited at the address and the corresponding option be enabled. To take over the country code before the zip code in the invoice, you must select this option here. If you want that the home postal code optional should be inserted after the contact, then you must check the box ' home postal code for AP in recipient address printing (if AP with HPC available) "enable.
Optionally insert also country, select the appropriate option.
If you want to create a cancellation invoice, then select this option - Please note that if you want to correct an existing invoice, also the corresponding invoice in the box "correction for" must select. With this option, all item quantities with negative sign be provided. You must enable the option "Requires payment of the customer" to generate a proper cancellation invoice!
To include a machine-readable bar code with the document number on the document, you must set this checkbox.
Optionally you can add the tax ID of the customer. If you don't want to use the stored in WICE header and footer graphics, since these are stored on your stationery, to enable the respective option for this.
Press now on create document. The document is now stored in the operation as an action and use in the document is filed with the respective opportunities. It opens the application for PDF documents linked on your computer and displays the generated document.
| Hinweis: Please note, that does directly modify these in production according to your administrator for many of these options for each of the document types has already made presets! |
Correct creation/editing of invoices with discount
To enable a clean processing of invoices in the WICE CRM Groupware in which, the customer should be granted a discount, it is absolutely necessary to proceed as follows:
1. Make the invoice for the full amount, i.e. the odds of that are used in the invoice have still no discount.
2. If the customer so late pays, that he has no right to discount more, simply enter matching the payment of the customer (in the tab "account current address) to the value of the invoice ("payment register") and the process is completed.
3. If the customer paid within the deadline and is entitled to discount, so enter a new chance in the process. Description "credit account", amount: negative cash discount amount, quantity: 1. Now use this opportunity to create a second account (i.e. a document with enabled check box "requires payment from the customer", the title of the document can be also "credit").
4. Now register 2 payments to these two bills: once the full amount to the first invoice and secondly the negative amount of discount for the second invoice/credit memo.
So, the correct recording of these operations and the corresponding representation in the OP-down list and the current account is guaranteed.
Shifting opportunities
First select the opportunities you want to move by clicking in the corresponding check boxes to move chances of a new planned completion date, and opportunities, click move and enter the following mask:
Here you see once again either a number of months enter the opportunities that you have chosen and can the chances should be moved or directly a desired completion date on the chances to be moved.
In order to apply the changes click Save settings.
Creating a new order ticket
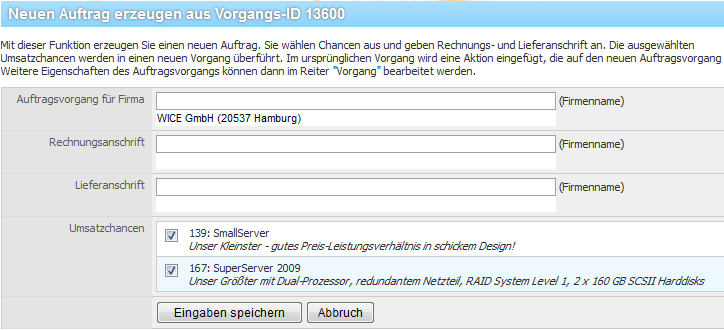
With this function, you create a new order process. You select opportunities you want to apply in the new order process and optionally specify a billing and shipping address for this new operation. The selected revenue opportunities be transformed into a new operation. In the original process inserts an action that refers to the new order process and vice versa. To do this you first click create order process + opportunities take over and go to the following mask:
First you can search now in the fields for the desired address, to which the new order process should be created - by default, the address is selected, to which belongs the existing operation. Also you can optionally assign a new billing or shipping address for this operation. There are including all the chances in the operation displayed and pre-selected. Order to transfer only certain opportunities in the order process, you must disable the respective check boxes before the individual opportunities. Finally, click Save settings is, along with the selected opportunities and creates the new order process. Additional properties, such as status or operation categories, and so on of the new order process can be edited then in the "Ticket" tab.
