Invoice print manager
Invoice print Manager
With the settings in the invoice print configurator you control the appearance and the types of documents available to create chance based documents such as invoices, delivery and credit notes etc.
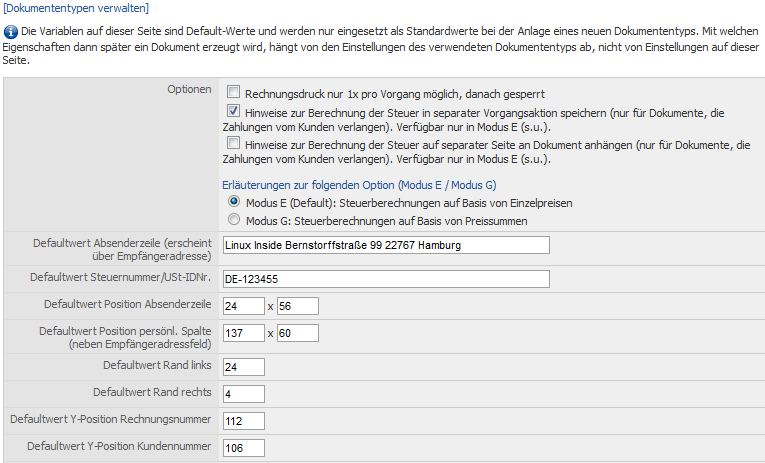
| Hint: The variables on this page are the default values and are only used as default values for a new document type. With which features or settings a document is later produced does not depend on this general settings but on the settings for each document type! |
You can define here whether the printing of invoices is allowed only once per ticket and is not permitted more than once. To activate this feature mark here the corresponding check box.
Also it can be optionally automatically created a notice about the exact nature of the tax calculation for each created invoice, so a document that requires a payment by the customer, in a new ticket note. To do this, you must enable this checkbox here. If you want that with each invoice automatically this note is included in a separate page showing the exact calculation of taxes for the individual invoice items on the invoice, then you must enable alternatively or additionally this check box. The 2nd option is recommended only if you have already received complaints about the tax calculation from your invoice recipients. Optionally you can send always the note on demand, which is deposited in a further ticket note.
Below are the available options for calculating the value added tax in WICE Cloud Based CRM. WICE offers you Mode E, in the tax calculations are done on the basis of the unit price and on the other the G mode, which is calculated on the basis of the price totals.
| Important: Any questions or ambiguities or even complaints regarding the calculation of the value added tax in invoices that were generated with WICE read the information in the link "Please read explanations for the following option" in the invoice printing manager. Here is explained in sufficient detail the differences in the two modes added by examples as well as any legal concerns will be addressed. |
Enter the default sender address below. This will appear above the recipient's address. In addition you can enter your own tax-id number.
You can position the input fields with the text boxes exactly in millimeters on the page layout. Position specifications are measured from the upper-left corner in mm. Through the internal conversion of the position information in inches, rounding errors can arise in the mm range. At the end, click on Save.
Managing document types
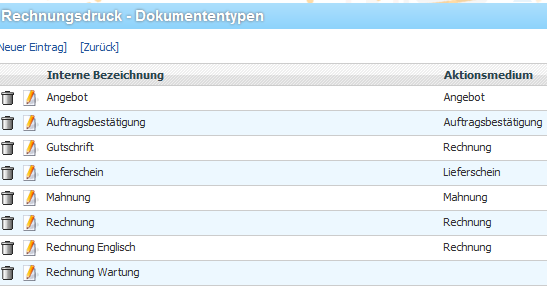
Click on the link [Manage document types] on the top of page and you can manage the different document types. Here you can also define completely new document types.
Click on the trash bin icon to erase document types that are no longer needed or click on the edit icon to edit existing document types.
Defining document types
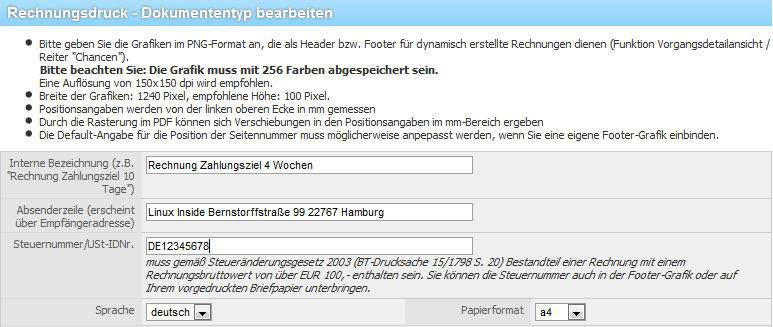
Click on [New Entry] to enter the input mask for a new document type.
First enter a name for the document type as an internal name - E.g. "offer", as well as the sender line for this document type, which should be displayed above the recipient's address in the document. Also enter your VAT ID, which is then automatically inserted below the terms of payment in the document. You can integrate this information also in your header or footer graphic - then leave this field blank. Then you can set by default the language and the desired paper size for this document type.
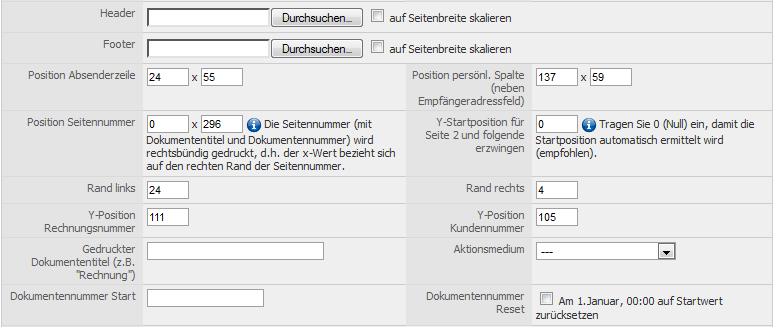
Here you can specify now the graphics in PNG format (max. 256 colors) which serve as a header and footer for this document type. The graphics should have a size of 1240 x 100 pixels and resolution of 150 x 150 dpi is also recommended. Click "Browse" to select the files from your local hard drive or network. By activating the check box next to it, you can scale smaller graphics on the entire width of the page.
Now, you specify the values for the positions of the text fields for this type of document.
As well as the printed (not the internal) title of the document, e.g. Offer, Invoice, Delivery note, which will then appear on the generated PDF, or the media category with which the document should be categorized in the ticket note.
You can specify coordinates for positioning the document number and the position of the page number in the field "Position page number" and in the respective fields for the coordinates of the document number. In the following box you can set a y-coordinate as the forced start value for the 2nd page and subsequent pages of the document. Please note as well as for the y-value of the page number position that an A4 page has a maximum length of 29, 6 cm - please only enter meaningful values in this field. If you enter zero in this field, the starting position is determined automatically. This is also recommended by us.
If you have set the document starting values option in the administration-> more system settings to automatic you can perform no changes or no reset for the document number here.
| Important: If choosing a manual selection of the document start value for the document types please note that you can use only whole numbers as a start value as well as the optional keyword YEAR. The placeholder for the YEAR is then replaced by the year entered when you create the document in the invoice date field or the current year if there is no chance with a valid end date. Make sure in the individual settings for the document types that these do not overlap the number ranges of other document types. Example: Assign the start value "YEAR1000" as the initial value for the type of document A and for the document type B the start value "YEAR2000" only 999 documents of this type can be created within a year before it comes to an intersection. To prevent this you must attach a "0" digit more. |
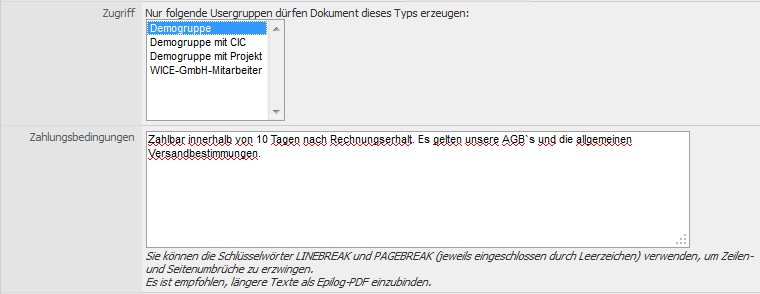
When you create the document you can define which user group can access this document – so that you can define certain documents only for individual users or user groups.
The text from the "Payment information" section will appear in the final document at the end of the table with the individual items. You can use the keywords LINEBREAK and PAGE BREAK (each enclosed by spaces) to enforce row and page breaks in this text box, or the generated document. It is recommended to include longer texts in the optional Epilogue-PDF.
Below you can optionally set the employee information that appears in the right column of the invoice for this document type. If the field is not filled then WICE uses the information stored in the profile of the respective employee automatically for this column here! In connection with the use of the function "Create document in the name of" in the document generation mask the information of the selected employee will be added then in documents where this field is not empty.
You can use the following variables: [address_employee.title], [address_employee.salutation], [address_employee.firstname], [address_employee.name], [address_employee.phone], [address_employee.email], [address_employee.fax], [address_employee.position], [address_employee.department] and [address_employee.category1]... [address_employee.category4]
There is also the variable "DATE" available. This is then replaced with the actual date in the creation of the document.
By choosing an Epilogue-PDF or Prolog PDF you upload PDF documents which are automatically attached either before or after the actual document. You can use this for example for the integration of your terms and conditions or further informations regarding the document.
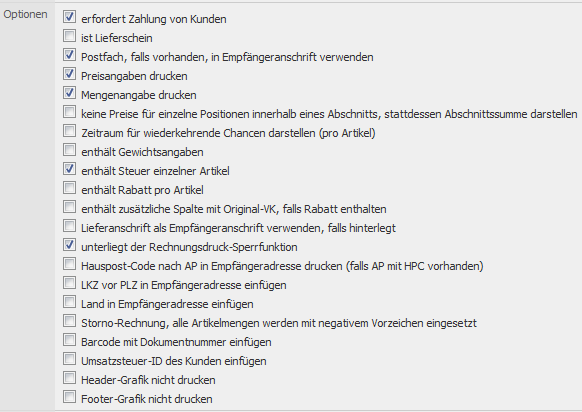
With the available options you control the settings for even more specific information on the document. These details come for example from the included articles.
| Hint: With the option "Payment requested from customer" it is set whether the values of a document (invoice) are displayed in the account section of a company address as an unpaid invoice. |
With the check box "Is delivery note" a document is marked as a delivery note.
The check box "Hide price values for positions within sections, only print the section's sums" allows you to include multiple items together within a section and not to display the unit prices but only the sum of each section in the document.
To display the period for recurring opportunities with individual articles in the document, select the checkbox "Print period for recurring chances". Otherwise this information will not be shown.
If you want to represent weights of the individual articles - if they were deposited for the article - in the document then activate the check box "Print weight values".
To display the tax rates of individual articles in the document in particular if articles with different tax rates exist, activate the check box "Print each article's tax value."
To display the article-specific discount for each article in the document, you must activate the check box "Print each article's discount value."
Optionally you can "Print additional column with original sales price (only if discount included)" by activating this check box.
To use a shipping address stored for this ticket as a mail-drop for this document, you have to enable the check box "Use delivery address if non-empty".
If you have enabled for the documents the locking function, so that the invoice creating is only possible once per ticket you must activate the "Obeys invoice generation lock" check box here.
If you want that the house post code should be optionally inserted in the recipients address then you must activate the check box "Print house post code in recipient address" here.
With activation of the two following check boxes you can set whether optionally the country symbol and the country name will be included in the recipient's address.
You must enable the check box "This document is a cancellation, all articles will be printed with negative quantity" to mark a document as a cancellation. Please note that all articles will then automatically be printed with a negative quantity in the generated document.
To include a bar code with the document number in the invoice/delivery note for external editing you must enable the check box "Insert bar code with document number".
To insert the VAT ID of the customer from the selected address of the recipient which must have been stored in the respective field you must activate the check box "Insert customer's VAT number".
Finally you can set if you want to print the stored header and footer graphics for this document type or since you want to use an own branded stationery for this document type it should not be used.
| Hint: Please note that most of these settings can be manually edited when actually creating the respective document within the ticket while some feature and options such as the locking function can only be managed here in the invoice print manager! |
Finally, click on Save to save your changed or create the new document type and you will return to the list of all previously defined document types.
