Ticket Notes
Inhaltsverzeichnis
What are ticket notes?
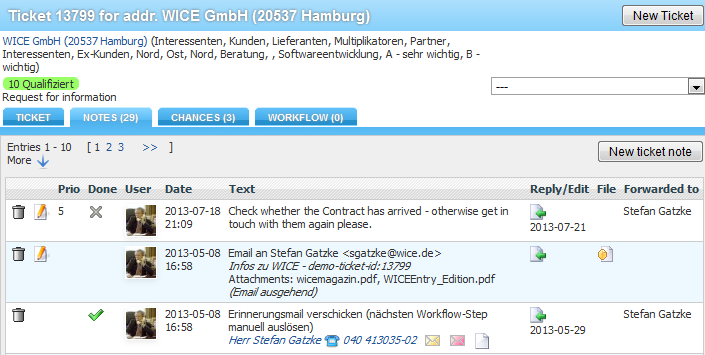
The ticket notes are one of the main operational features in the WICE CRM, and at the same time also the chronological documentation of all ticket actions displaying it`s complete history. Here you can
- create hold files for yourself or other employees,
- add phone logs, visiting reports, or any other document,
- create new appointments
- create and send new E-mail messages
- create letters, faxes and other documents and send them directly using the fax.de plugin.
- initiate calls to your contact persons with our CTI integration by clicking on them.
Creating new ticket notes
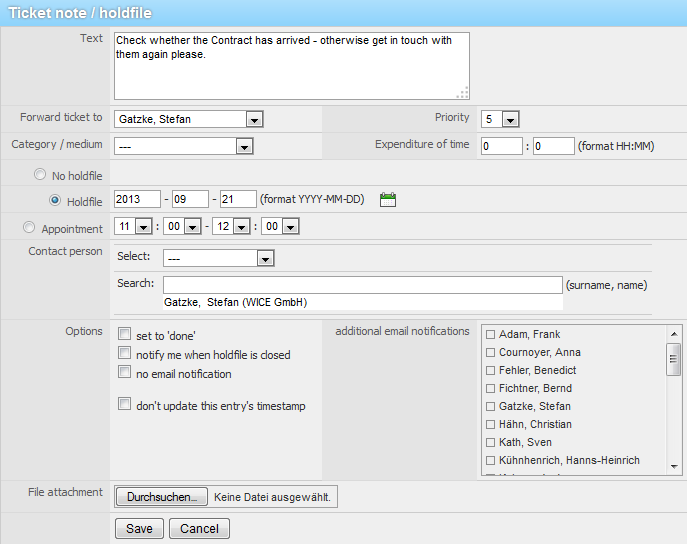
To create a new ticket note, click on the button New ticket note and you will see this input form:
Create of a new action.
Entering the text for a ticket note
Type the text of your note in the field "Text". The text that you enter here should describe what you have done or what needs to be done in case this ticket note will be forwarded as a hold file to you or any other of your colleagues. A ticket note can either be just for information to other employees, can contain a direct to-do or might also be created as a new appoitnment.
Assigning employees
Now you select the employee for which you want to create the hold file to deal with the new task. Your own employee is preselected here by default.
| Hint: If you are selected as the recipient of the hold file, the check box to send an additional email notification is automatically disabled therefore also the list to select other employees as recipients for further email notifications is not displayed. Only if you have selected another employee or deactivated the check box for further email notifications, the list of employees list is displayed in the box "additional email notifications to choose from! |
Assigning a media category for a ticket note
You can assign a media category for each ticket note. By selecting the media category it is easier to find any other ticket notes with the same categories in the list of the ticket notes or in the document tab of the address. So you can specify how this kind of contact was established, for example via phone, fax or email or what kind of note it is, an offer, invoice etc.
Expenditure of time and priority
In the field "Expenditure of time" you can optionally enter the time that was required to finish this task. This will be added to the total time for this ticket and will appear at the foot of the ticket note overview of the ticket and can be transformed into an opportunity. You can also change the priority for a ticket note. The selected priority will also be shown in the list of the hold files on the dashboard.
Ticket note without a hold-file
If you just want to enter your details as an information to complete this note, so that no further hold-file is necessary, you need to select the option "No holdfile".
Hold-file
If you want to set up a hold file with a to-do you need to select the option "Holdfile" which is already preselected by default. Then you enter the desired date until when the hold files needs to be done. You can also click on the calendar preview button to get an overview of the calendar and you can click on the desired date. The date is applied automatically to the calendar fields. If the action for this hold file depends on a certain time you can add an alarm in the field "insert alarm at". You or the employee to whom the hold file is assigned will then receive an additional notification on the selected date and time.
The hold-file as such will then appear in the dashboard of the selected employee.
| Hint: Hold-files are used to create a list of individual to-do's, and are not to be mistakenly used as appointments. It is possible to create appointments out of ticket notes but these are real appoinmtents as meetings or conference calls etc. at a fixed time which will then be also added to the calendar. |
Creating an Appointment out of a ticket note
If you want to create an appointment out of a ticket note enter the date for the appointment in the a promotion in the line for the hold-file date and select the period of time and the ticket category from the list. The appointment will automatically be added to the calendar and also a new ticket note linked with the appointment will be added.
Assigning a contact person
You either select a contact person for this ticket note from the drop down list (here in this list the contact persons of the assigned address are included) or you can use the AJAX search box therefore you have to type the first few letters of the last name. WICE will then automatically display the matching names. Now click on one the name of the contact person that you want to assign, and it is automatically associated with this ticket note.
More options
In the options you select whether the ticket note is already set to done, which would be the case when the note was added just for info, without a hold-file or whether you want to be notified upon completion of the hold file via email.
To inform others about this ticket note by email, select them from the list shown in "additional email notifications" and activate the check boxes. 'Please note that the list only appears when you assign the follow-up/hold file to another employee as yourself or disable the "no email notification" checkbox.
In addition, you can attach a file to this ticket note. To do this, click Browse and select the file in question.
To save your inputs, click on Save. The new note appears automatically in the tab notes in the ticket.
Other features
Completing a task/hold file
When you have completed the task in the hold file you can set it to done. To do this you can click on X-Button in front of the hold file in the "Done" column. Now a green hook indicates that the hold file was set to done. Please note that hold files that were set to done will be no longer displayed in the list of hold files in the dashboard!
Ticket note reply / Reply History
By clicking on the reply button at an already exisiting ticket note in the "Reply/Edit" column you can directly add a new ticket note as an answer to the selected ticket note. The input form for a new ticket note will be opened and the text of the former note will be automatically inserted so that you can use this for any comments in your reply as also the employee who submitted the former hold file is automatically assigened as the recipient for this new hold file. After saving your inputs and creating the nore it is now automatically linked though the reply-history with all former ticket notes, so that these create an internal history for this subject discussed in this notes inside a ticket. To access the individual reply history click on [Show reply history] in the text column at the respective ticket note. This improves the traceablity for the involved employees between the linked ticket notes especially when many different subjects are discussed within a ticket over a longer period of time
Creating Emails
If you now an E-Mail or a document to the assigned contact person want to create, then you click on the document / email. Opens when you click on email is either the window of your local E-mail clients or of the E mail client of WICE. You make the setting which email with this function is linked in your profile!
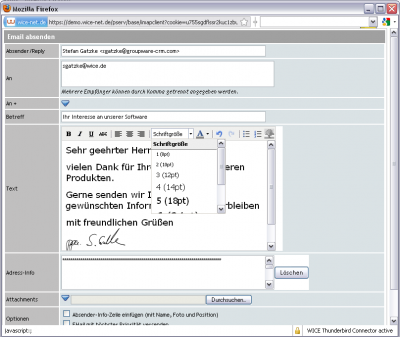
When you create the email is the WYSIWYG editor available, which allows you to email, such as in a word processor format and for example the font size (see screenshot) or to change the font color or insert bulleted lists, etc. So you can already see how the email the recipient will arrive. In addition to attachments, which you can attach the email directly in the text as an image embed. To do this first select the attachments in the order you want and insert them and then click the tree icon in the options bar for the formatting.
It will open a Pop-Up window, where you can select which you want to include the attachments as a picture. You can select the position of the image in the text itself: If you have integrated the image by clicking on the button "Add" in the email, you can then position the placeholders in the text where you want.
Below the input field for the Emailtext, you have the option to select up to five attachments to be added to your email. We recommend 5 attachments should not enough to grab the individual files in a file to attach it as a zip file. Thus, you can send almost unlimited files.
| Tipp: In every email that you send, you can optional and in addition to the send your email signature, a sender info line with your name, your photo and your position (in the company). These will then be preceded in the layout of the email with the words "It writes you". To do so, the corresponding checkbox must be enabled. Please note that your profile in the "Settings" tab an image file in .jpg format must be defined. |
To send an email with the highest priority to the recipient, select the corresponding checkbox "Send EMail with the highest priority".
To leave, to see a preview of your email, click the button Preview. To finally send the email, click on send mail.
When you send the email through WICE, then these will automatically as an action, such as the attachments sent with also, where Stored procedure.
Creating documents
To create a printed document, click on "Document". From the list, select the desired document. If you want to give your own name for the document to be created, or change the shown here name and the document is created with your name and stored – please keep in mind that no special characters may be included in the document name! You want to save the document as a note in addition, make a checkmark at "save individual documents as Adressnotizen".
If the template contains so-called custom variables you can now insert your text in the input fields. Then click Create document.
You can either download the document to your computer, save it as action in their operation, or simply go to the operation.
If you have saved the document as an action, another entry now appears so in your operation. You can open the document. To do this, click the file icon in the column 'File' action.
Expenditure of time
To display the registered time required of each of its actions allow, you select the check box of "Time". Then reloads the action overview and another column of the time required is displayed.
You can convert the time required in a chance, click on "convert time expenditures into chance". Then go to a selection mask to convert chances to each action. Select a medium here. Get you where you first select the category and then the corresponding article to the appropriate article. Now select the action to convert to from the list and then click go!.
Usage of additional functions in the note overview of a ticket
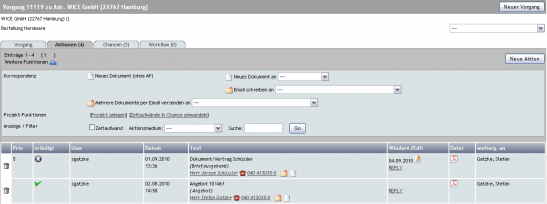
When you click the blue triangle in the form of actions overview of operation, the mask is extended by additional functions:

Screenshot: Mask of the overview of all operation actions with open options for the use of the other functions
Here, you can now use the below described, further functions:
Correspondence
To create a document, without linking this directly with a contact of this address, click the Briefsymol next to "New document (without AP)" and appears in the edit field of the Dokumententemplates deposited in your client. If you want to give your own name for the document to be created, or change the shown here name and the document is created with your name and stored. Please keep in mind that no special characters may be included in the document name. You can now select a document, and then, optionally, notes save as this, so you make a checkmark at "save individual documents as address notes".
If the template contains so-called custom variables you can now insert your text in the input fields. Then click Create document.
You can either download the document to your computer, save it as action in their operation, or simply go to the operation.
You can also create a document on a previously selected contact to this address. To do this from the menu next to the function "new document select" the desired point of contact and you then click the envelope icon - go express in the mask for the selection of the document template with the known options.
Analog to printed documents, you can also directly write an email to a contact person. To select the desired contact person on the selection field next to the function "Write email" and envelope icon, which is located right and it then click on the mask to create an email when the selected contact opens already recipient is registered as.
Also, you can send several documents that were linked to this a representative via email. You can choose initially from the list next to the function "Send multiple documents by email to" contact out on the right next to it and then click the envelope icon, and you get the following view:
Here, you can now set, whether the sending of E-mail to optionally are documented in a process already to this address by selecting it from the list. Then select from the available documents that should be attached to the email and click finally on "email compose. Now the mask to create an email opens and the previously selected documents are enclosed as attachments here already. When you have entered all data or text on the screen, click on "Send mail" and the email will be sent to the recipient.
Here, you can directly create a project linked to the operation, which then available for further use in the project module of the CRM-Groupware WICE available - to do so simply click on "to the project" and appears in the mask to create a new project, which is already populated according to the link with the operation of the part.
Function a well-designed chance cast, entering the following mask:
547px
Screenshot: Mask to convert action efforts into opportunities
Here you can convert any stored time efforts in revenue opportunities to the other billing in existing actions. You can choose first the options according to which generated the revenue opportunities are and then select the transforming actions or their efforts. To now convert into sales opportunities, click "Go!".
Display / filters
Via the check box "Time" you can optionally display the column time action overview, in which may define actions time required are displayed. To do this, simply activate this checkbox.
To the actions according to the existing media categories to filter, select the required category in the list and the display of the actions is limited accordingly. This can be useful for example if you want to specifically search for actions, where offers or invoices have been deposited.
To perform a full-text search in this process, enter the term to search for in the "Search" box and then click "Go" - large operations it is advisable not to generally maintain the search term and to limit exactly. Optionally a cross-process alternative available is with the ticket & grade search plugin.


