WICE CommCenter
Inhaltsverzeichnis
CommCenter
This module of WICE cloud based CRM serves all users for the exchange of information and as a central communication platform. Essentially, it consists of following communication tools:
• E-Mail Centre
• Discussion forum and chat room
• Messaging
• Fax (optional when using the Fax.de plugin)
• SMS (optional when using the Fax.de plugin)
WICE cloud based CRM offers you a fully fledged and purely Web-based email client for reading and writing your emails. You can query multiple IMAP mailboxes with it.
| Important: Because the POP3 client is not being maintained or developed further, we ask you to contact for questions regarding the operation on the information about the POP3 client in our manual stored in the support center for the release 4.3! All new customers can only use IMAP client |
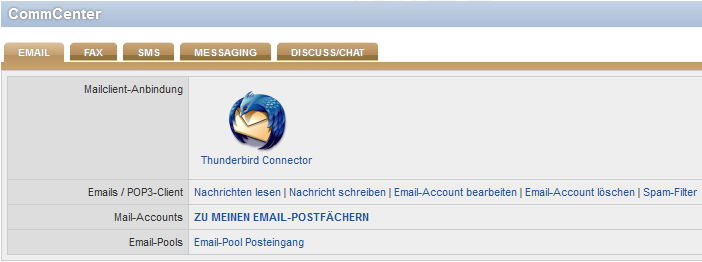
To access your IMAP accounts stored in WICE, click on IMAP accounts and mail automation and it appears the following view:
To invoke the relevant email account, click the names of the accounts and this will open in a new window.
Setting up a new email account
To query an existing email account in WICE CRM you must first enter the necessary account information.
| Hint: WICE offers no own IMAP or POP3 accounts - WICE only queries your accounts, whether located at your provider or on your own server! |
Click now on New entry and you get the following view:
You now enter your the emailadresse and the password and click Continue. Wice will now try to retrieve all the necessary information to set up your mailaccount from your mail provider. This may take a few seconds and then you will see this mask:
If Wice was able to retrieve the information it was already added to the respective fields - otherwise you need to complete the fields yourself.
| Important: Please note that the field "Email address" needs to contain a valid email adress in order to be able to send any emails from this account! |
First you have to fill in the Email adress for this account and then you have to enter the hostname of the server, for example imap.emailserver.de - you will get this from your service provider, or your administrator.
| Important: Please enter the name of your incoming mail server without the prefix http:// in the corresponding field, otherwise the server will not be properly addressed! |
Then you need to specify the Username for the incmoing mail server and the password. If you want to use your own server for outgoing email (recommended) fill in the corret hostname. If the server requires the same password as the incoming mail server then carry on, if not activate the checkbox so that the additional fields for the username and the password for the outgoing mail server appear.
Now click on Save to complete the set up process.
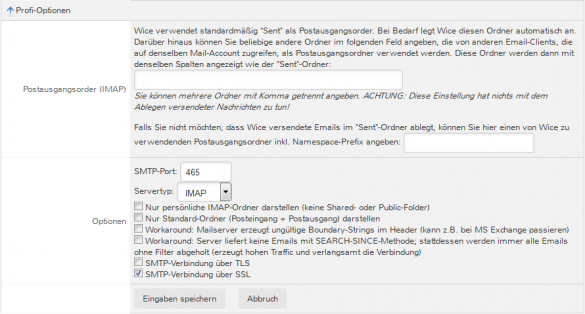
If you want to access more options click on the blue arrow underneath and the mask will expand to this view:
You can specify here, if you use multiple email clients to query your mailbox, which will folder will be your sent items folder. The WICE-IMAP client uses "Sent" as the default folder. WICE automatically creates this folder if necessary. In addition you can specify here any other folder for this account, used from other email clients that are accessing the same E-mail account, as the default Sent/Outbox folder. These folders will then appear with the same columns as the standard "Sent"-folder. Enter the desired folders separated by commas.
If needed you can specify the IMAP port of the IMAP-server. Now, you can choose whether you want to retrieve this mailbox through IMAP or IMAPS and select the option that you want.
As an option in the IMAP mailbox, you can activate the check box "show only personal folders (not shared or public folders)". Accordingly, only the above types of folders are displayed.
| Hint: Please note that the Microsoft email service outlook.com does - as from July 2013 onward - no longer support IMAP access! |
In rare cases it can happen that your IMAP-Server(not Wice!) creates invalid boundary strings, E.g. MS Exchange. Here, usually your administrator will know about this exceptional case and will inform you and only then you will have to select the check box for this workaround. With the next two check boxes you can optionally select if you want to establish the connection to your SMTP server via an TLS or SSL. Finally click Save and your mailbox is available to be used with the CommCennter.
Editing an email account
To edit one of your E-mail accounts, click on the Edit-Icon of the E-mail account that you want to edit.
| Hint: Please note that in the field password no entry is displayed, even if already a password for this account has been deposited. Passwords will be stored in WICE only encrypted on the server and thus consequently not shown here! If you don't want to change the password, simply leave the field empty |
Click on "Save" to incorporate your changes.
Deleting an email account
To do this, click on the delete-icon of the E-mail account that you want to delete.
You will be asked to confirm the deletion and if you click on "Ok" the account will be permanently deleted. Your mails will still remain on your IMAP-Server.
Using the WICE IMAP client
If you have set up mailboxes as IMAP mailboxes, then you see their available mailboxes emails / IMAP client here. These mailboxes can be and to do so please click on the appropriate link and the IMAP client will open in a new window.
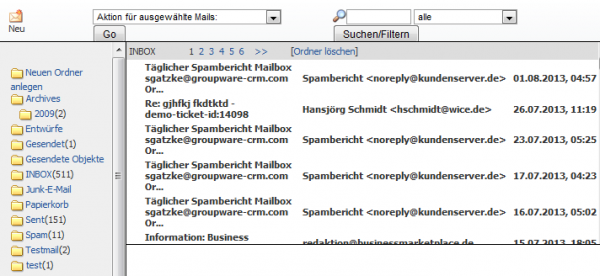
First, you see the folders for this mailbox on the left side. In an IMAP mailbox, set up the folder directly on the server, so that this folder structure always available to you, even if you also retrieve your emails with a different email or edit. Also the emails remain on the server and are not, as when a POP3 account, on each fetch downloaded. The advantage is that even emails you write directly from WICE, E.g. from an action, are stored in your Sentfolder and are therefore also always available.
To view your emails into the respective folders, click the folder and then, get an overview of the emails. On the basis of the numbers behind the name of the folder, you will see how many emails in the folder are available. The emails that are in bold indicate the number of new, yet unread emails. Please note, as WICE cloud based CRM is a Web-based software, it may take some time if necessary until the number of email messages or the email displayed in a folder in the view of your Emailclients are updated.
If you click on an email from the list, the menu bar will expand to the appropriate button for further processing:
Here you can now mark the selected email, then the email in the email list marked red or but can will mark an email as done, then a green check mark before the email is used. You can display the header of the email and answer of course the email directly, or write a reply to all recipients of the email. In this case, the mask to compose an email opens, depending on which setting you have made in your profile.
A particularly effective use of this module is for you, if the E-Mail addresses stored in the module "Addresses" directly with the email Center of WICE are linked and when you click on an address not the local email client of your device but the WICE CommCenter will open automatically. You can define this settings in the "Profile" module.
You can also forward the email or move which is located in your email account to another folder.
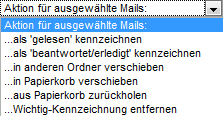
For more options to manipulate multiple emails, in the drop-down menu to to select more than one email from your folder hold down the CTRL key when you click and then select the desired function from the menu and then click "Go". To search your email, enter the desired search term in the box next to the magnifying glass and then click on "Search/filter". You can restrict your search in the category select menu from the adjacent drop-down.
If you want to create a new folder in your mailbox, then in the overview of your folders, click on "Create new folder" and then assign a name for the folder, and this is applied directly on the server of your mail box.
The chamfer to a new email click top right in this mask from the envelope icon "New" and enter the mask to create a new email.
Assigning emails - working with email notifications
As a special feature in WICE an to maintin the communication history WICE cloud based CRM offers you the possibility to assign incoming emails to an address as a note or directly a matching ticket directly. When you click on an email in your mail box this option is displayed:
If you write an email directly from an action from an operation in WICE on a receiver, a ticket-ID in the subject line of the email will be inserted automatically. Use this ticket ID, as shown in the screenshot to see the incoming emails are allowed to directly back the relevant process and is there, along with any existing attachments, designed as a new action. To do this, you need only click the link "save this message as a task action: ' and the email will be applied to the operation as action and you can there continue to edit or write an answer directly in the process.
If the ticket ID should not exist or may be lost or has been removed, you can sill manually this email to an address as a note, and then if appropriate, route it to the matching ticket.
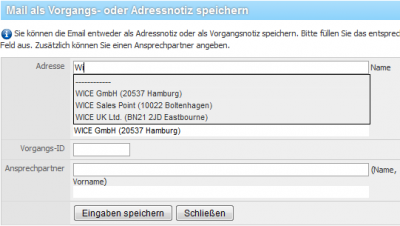
To do this, click on the link "Save email in selected ticket or address" and it opens the following view in a new window:
Here you can now search in the appropriate box according to the desired address or the point of contact, you simply start typing the company name and WICE automatically adds the appropriate search results. Should the matching process ID be known to you so you can enter here also directly these and the email is stored then as well as a new action to the selected operation and appears in the appropriate view. Information further to subsequently assign of an email saved as Adressnotiz an operation here in the WIKI addresses.
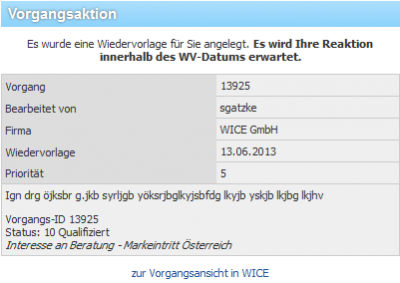
If you receive an email notification of a new follow-up or an action, so an internal link is inserted here which you can use to directly from the user to the associated action/follow-up can reach.
When you open this link in a new tab/window now, click on the right mouse button, you will be redirected to the respective ticket not and can begin directly with the processing.
Email automation
Here you can define rules for incoming emails to be assigned directly to a specific folder in your IMAP mailbox and be sorted or be deposited directly in WICE to a ticket or address note. You can also set up and manage auto responders for all your mailboxes.
Click on the tab "Automation" to get to the overview of your established automation processes:
You can see your previously stored processes. You can delete processes, and edit with a click on the respective icon. You also see in the column "Active" on the basis of the Green hook or the grey cross if a process is currently active. You can change this by clicking each. By clicking on "LOG" appears in the log view of the process listing you when and which were last assigned to emails.
| Tipp: You can define multiple automation processes per mail account; These are processed in order, which follows it from the Automation description. It is therefore advisable to begin with "10...", "20...", etc. the descriptions when necessary. |
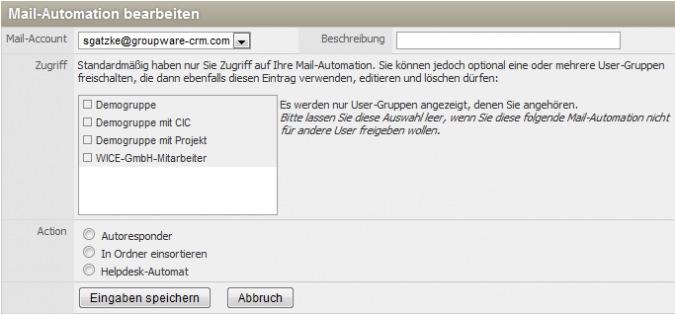
To set up a new automation process click on "New entry" and you get first in the following view:
Here now select the mailbox from the guest account from the drop-down menu you want to set for the automation. Optionally, you can enter a description for each process.
Managing of auto responders
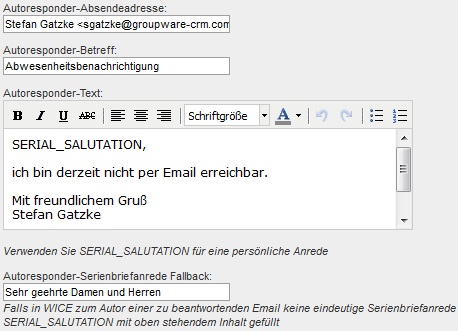
If you now select the option autoresponder, the mask extended to:
You can see the already filled with a simple template mask for the text of your autoresponders - the series letter salutation is already as placeholders are filled and automatically if the receiver WICE is known, fill in the shipping. You can now of course still according to your ideas and needs complement the subject and the text, or change. Should be no mail address for the recipient or can this non-unique identified, so you can define a general form of address in the box for the autoresponder series letter salutation fallback, with then the placeholder is filled for the series letter salutation will.
Automatic email sorting
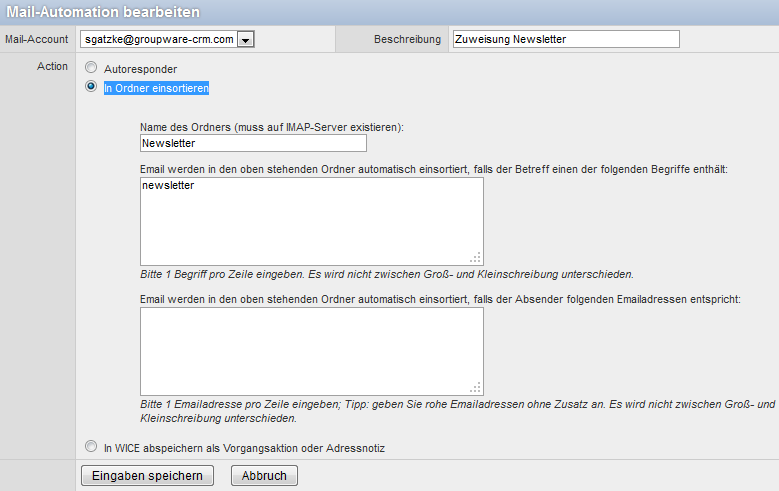
To sort emails with a certain subject or from a certain sender automatically to a specific folder in your IMAP mailbox the option is "In folder sort" in the email Automatation and appears in the following form:
You can now decide whether emails that contain a certain subject or from a specific sender address should be sorted in a your email mailbox folders selected by you to. The name of the folder of that you select must exist on the IMAP server. You can enter one entry per line each in the fields for the subject - here it does not distinguish between uppercase and lowercase. Finally, click to save your entries, save on inputs. You can anytime more automation processes hinterlege and edit at any time.
Automatic storage of emails as a ticket or or address note
This third option in the email automation, incoming emails are automatically on the basis of the sender and the subject analysed. Found in the subject line a note on an operation ID so it is created in the corresponding process as a process action. Otherwise the sender email address is identified, and there will be an Adressnotiz of the found contact person or the company. "' The email is after editing not your Inbox removed from, i.e. You get them in beyond normal. "'
| Hint: Keep in mind that this option should be used only in selected cases to prevent a flooding of the WICE database. Examples: storing returns from mailing actions. |
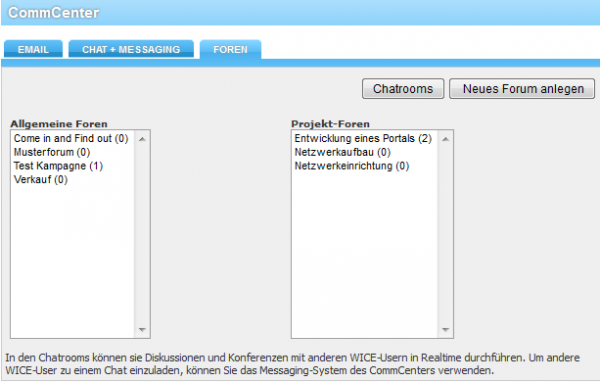
Discussion boards
The Discuss boards tab offers access to the discussion forums and chat features independently of the user location and time with the option to archive all the relevant content of the communications.
The discussion forums are divided into project forums and in general forums. The key difference lies in the accessibility. In general forums, all users can discuss project forums are tied to a specific project and are therefore only the employees available, which is involved in the project. In contrast to the accessibility, the handling of general forums and project forums is the same. You automatically create project forums in the module "Project". Enable there at the creation/editing of projects that create option project Forum. For more informations have a look in the Projects module.
Taking part in a discussion / chat
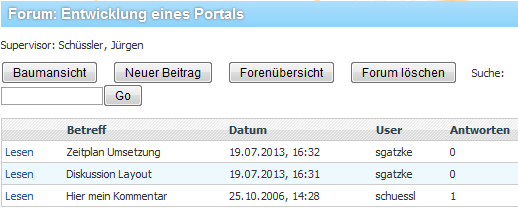
You open a corresponding board by clicking on it with the mouse pointer.
To take part in a discussion with new contributions, click on "New" entry". Enter your information. Browse your local network if you want to attach a file to your message. After saving the entry via the Save button, the post will appear in the list and is filed until the end of the project. The same applies to the answers.
Chat rooms
Another form of communication is a chatroom. Public ¨ are there chatrooms (Public1...), which are available to everyone, and project-related chat rooms, which are accessible only to staff, this project also a task have associated with that.
In the "Chat Message" input box, enter your text with 80 characters max, and click Send. The employees participating in the chat will now receive your message. To know who wrote what, the name of the participant appears left of each message.
Chat archive
Chat messages are generally not stored, but can be filed permanently in a chat archive as needed and stored. To do this, click Chat archive. Select the desired chat archive on the right side of the window. Immediately all here related chats are displayed.
Messaging
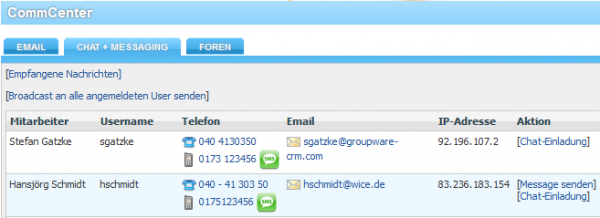
On the Messaging tab can be used to communicate easily and quickly with each user within a client. You can send this a message, or you can invite them to chat. After clicking on the map tab, you will receive an overview of all the users in a tabular format.
You start each by clicking on the desired action with the mouse. Send a message, this will take to another window to the writing of the text. Finally, click Send message. You receive a program message that the message was sent.
Want to make a chat invitation, so you click on it. Here, too, you receive a program message that the message was sent. Would you like to send a message to all users logged-in, click on "Send broadcast to all registered users" and then type the text. Now, all registered users will be notified.
Should you again to access a message already received must, so click [message received] and takes you to an overview of all messages that you have received so far.
| Hint: Unread messages can arise when a pop-up Blocker in your browser is enabled and the message sent to you for this reason can not be displayed |
Fax
| Important: To use these features, the Fax.de plugin must be installed and you must register at Fax.de - use are appropriate costs according to current price list in your selected plan (more information at http://www.fax.de), which are provided directly by Fax.de charged. The Fax.de plug-in must be configured with all the necessary information, so that you can receive your faxes here |
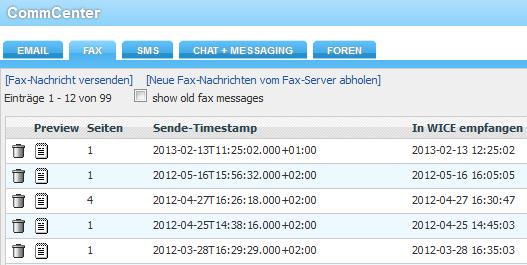
In the browser, you will see all previously received faxes:
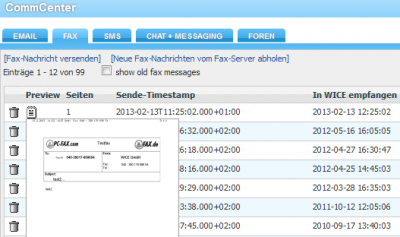
They easily let when you hover the mouse over the sheet icon in the column preview, show a preview of the respective fax:
You also see how many pages the fax contains and when the fax was sent or when it was received at WICE.
To get new fax messages from the server, click on [pick new fax messages from the fax server] - the view is updated and should be new faxes, so it will be shown here.
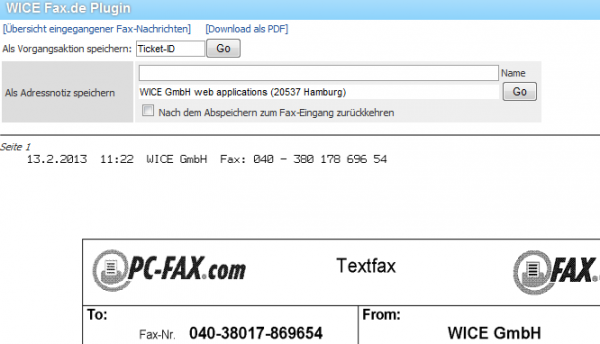
To assign a fax to an address or a task, click the hand icon in the preview column and get the following view:
Here you can find a matching address now either where the fax is then stored as a new Adressnotiz or directly, if known, enter a ticket ID, at the fax then is filed as a new action. Completing the click on "Go".
Optionally, you can download the fax as a PDF document - click on the link [Download as PDF].
Sending faxes/letters
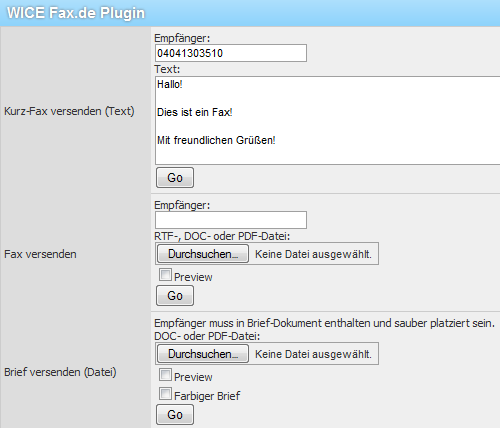
A document to send fax or letter, click on [send fax message] and they come in the following view:
Here you can now either directly write a text fax and send to the desired number or but a document (in the format of RTF, doc or PDF file) upload which then when fax is sent.
| Hint: About plugins you can access to, if you have the necessary rights, directly on the send log of all fax/SMS/letters etc. to verify the shipping. Also you can send here directly fax or text message. |
To send a letter, you must upload the file in .doc or .pdf format - please note that the sender or recipient data correctly - placed and look before sending them to have a preview of the document.
To raise the shipping click button each on the corresponding "go".
SMS
To send an SMS directly from WICE Note Please also refer to here in the section "Fax" in the Setup and configuration of the Fax.de plugin, because otherwise, you can send any SMS!
To send an SMS, first enter the telephone number of the recipient, and then add the text. Please note that only 160 characters per SMS can be used.
Optionally, you can send the SMS as a so-called Flash SMS, which is stored not on the receiver, but will appear directly on the display.
Then click "Send SMS" and the SMS is sent to the message center of the provider and get a status message when successful delivery as answer Fax.de.
