Workflow Manager
Inhaltsverzeichnis
Workflow Configurator
A simple, yet effective means, to achieve a higher customer focused orientation and customer satisfaction is the setting of standards in dealing with customers. The workflow configurator helps you create consistent processes. Once set the individual steps of a workflow can be obtained by the employee in the ticket. This such as using pre-defined emails with attachments can be reminders to calling a prospective customer in a certain amount of day or the change of task status after a certain period. These are triggered by the user in the respective ticket.
You can create as many workflows as needed for different work processes. Workflows can have steps that are triggered automatically triggered manually or a combination of both in the same workflow. It is also possible to define steps as branches with different options.
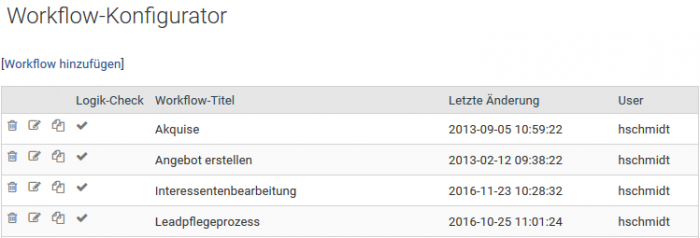
In the main view, you will see the already established workflows. By clicking on [Create new workflow] you can create a new workflow. You can delete a workflow by clicking on the Trash bin icon at the workflow you want to delete. Click on the edit icon to edit an existing workflow.
Defining the workflow
After the click on [Create new workflow] the mask to create a new workflow appears:
Enter an explanatory name for the new workflow and click on Save. You can now define the individual steps of the workflow. You can define the workflow so that each step may be performed at any time. Therefore you need to acitvate the checkbox "Steps may be skipped, no mandatory order".
Defining workflow steps
To define a new workflow step, click on [Add step]. The window to create a new workflow step opens.
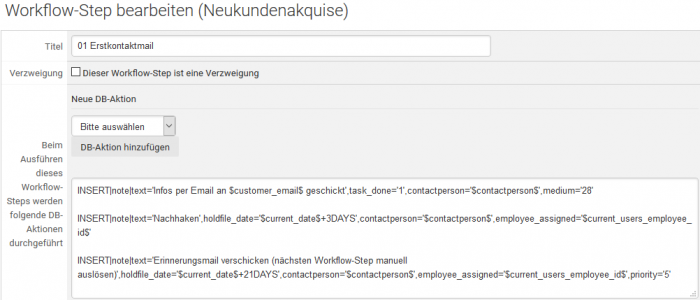
In the upper third of the input mask, you can enter a title for the workflow step, define whether this workflow step is a branch and what database actions during this workflow step to be taken. The format for database actions is: "SQL Command|Table|Field descriptions". The field descriptions are in the format "column name ='value'" specified. Single quotation marks are mandatory.
You must specify a database command per line. In the screenshot, you will see some examples of database actions. Note (for ticket notes), chance (for opportunities), ticket, as well as task (for the hold-files) are the supported tables in write mode. In read mode (to link dynamic variables) note, chance, task, article, ticket and category are supported.
Defining workflow steps with hold-files and ticket notes
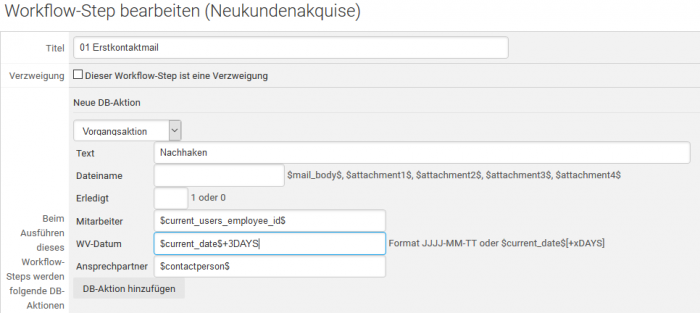
You can define ticket notes with or without holdf-files in a workflow step. The following example explains this on the basis of creating a ticket note with a simple hold-file:
Once you have selected "New DB action" "ticket ote" in the select list, the input mask is changed. In the example, an open hold-file (field "Task done" with value "0") with the text "Please check if interested" (field "Text") appears three days after execution of the step (field "Holdfile date" with the other variable for the current day + 3 days) for the person who executed the workflow (field "Employee").
Changing the ticket status through a workflow step
You can change the ticket status with a workflow step. For this select "Ticket change" in the select the new status in the select list of "Status change".
Changing from one workflow to another
You can switch within a workflow step to a completely different workflow. To to this select "Ticket change" from the list of "New DB-action" and then select the new workflow from the select list at "Workflow change".
Defining workflow steps as branches
With a branch, you can submit the user two options for the further assesment of the workflow. When choosing an option this is then referenced on the next step. If you activate the checkbox for the branching ("This workflow step creates a branch") the input form changes as follows:
The screenshot shows an example of a branch. Enter a text for each option. This text should be linked to the title of the following workflow step. For each option choose the next step through the selection list. In addition, you can enter additional database actions in the associated text box.
| Hint: Please note that you first need to define all the necessary steps to be able to define the available branches correcty |
| Hint: To make the workflow steps appear in a reasonable order you should name all of the steps starting with a digit. As a result they will be automatically sorted correctly and therefore are easier to select |
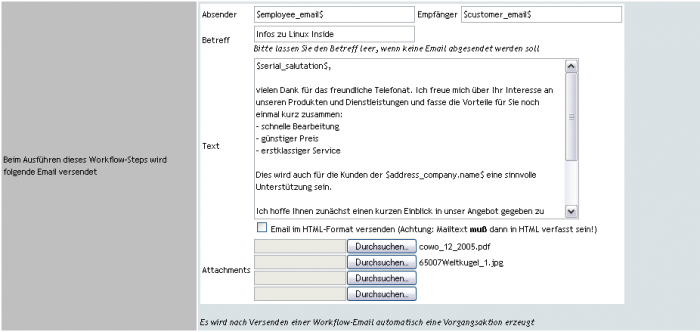
In the middle part of the input mask, you can define the text and attachments for emails to be sent via a workflow. For each of these emails, you can predefine and attach up to four attachments.
Variables supported for the sender, recipient and text are: $ticket_id$, $employee_firstname$, $employee_name$, $employee_email$, $employee_signature$, $employee_post_signature$, $customer_email$, $serial_salutation$. Please note that all variables need to contain valid email addresses otherwise the receiving MTA might reject the email. These variables can be inserted anywhere in these fields. WICE will then automatically replace them with the correct input.
If no email should be sent, you just leave the subject line blank. When you execute the workflow steps, the predefined text can be changed individually by the user. Individual predefined attachments can be disabled before sending.
For each step, you can set whether this step will be executed automatically or manually and by which step the actual step is preceded.
If a step should be performed automatically, you first select automatic from the list and then you can enter the number of days in the field "days after executing the following step:" that you want to be elapsed after the workflow step you select from the adjacent list until this step is executed.
Click on Save to create your new workflow step. Your new step is now created and displayed in the overview chart.
To delete a step click on the trash bin icon at the step to be deleted.
A logic check is performed after every entry you add or edit. This checks whether the sequence of steps make sense and if all steps in a chain of steps available. If the logic check reports an error please edit your workflow steps until the error message no longer appears.


