Addresses
The address database is the heart of a Customer Relationship Management. The quality of the addresses is of crucial importance for the success of CRM.
Inhaltsverzeichnis
Address categories
Addresses can be segmented by different address-categories.
Basic categories / types of addresses
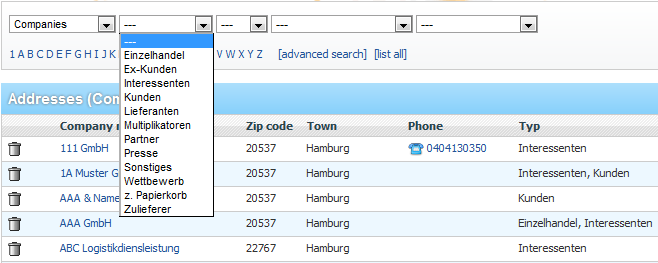
WICE cloud based CRM distinguishes between four different address types that can`t be changed. You will find these in the first pull down menu in the addresses module.
All four address types have different properties and consequently different input fields in the respective address masks and offer different functions that are associated with the addresses. Under the address type "Company" we understand any business contact that is in any form associated with your company E.g. customers, suppliers, partners, prospects, etc.
The address type "Contact person" refers to individual persons who are employed at the companies and therefore they are in most cases linked with a company address - but Contact persons can also be entered without beeing assigned to a company.
"Employees" however, are your colleagues with whom you are working in your company.
The address type "Private" is intended, for purely private addresses, which are accessible to only the individual user who is logged in under the respective account.
| Important: The basic categories are predefined and in contrast to the other categories in WICE cloud based CRM these are non-retractable. |
The sorting in the pull down menu is in an alphabetical order. As a default setting, when entering the addresses module, "Company"-addresses on the list of the basic address types are displayed.
When selecting only the first category (Company, Contact persons, Employees, Private), to get all addresses of this type to be displayed in alphabetical order. Here, the information specific for this address type is displayed according to the selected type.
Freely definable address categories
For the basic address types Company, Contact persons and Employees are four configurable address category groups (filters) available, which you can use to flexibly categorize towards your needs.
Each category group can contain as many categories as needed. With the quick selection option at the top of the window, you can select certain address groups. To do this select the desired category entries, and then click on "Go".
Please keep in mind that you can only choose one attribute per category in this view, although an entry can be assigned to multiple attributes within the same category! Use the module "Campaigns" to create such an address list.
| Tipp: If you move with the mouse pointer in the address module over the company's or contact categories, or in the ticket module over the ticket categories or in the project module over the project categories or in the project detail view over the drop down menus, the title of each category appears in a small tool-tip window. |
By clicking on the << >> arrows at the bottom of the window of the address list you will get to the next or to the previous page of the listed entries. You can also directly click a number to skip several pages. The active number is colored in black to indicate the page on which you currently are.
| Hint: Your WICE administrator can define in the administration which address fields are shown by default in each list view of the company, contact-person, and employee addresses! |
When you click on a company name on the list the detail view of the selected entry appears. When you click on an existing email address WICE opens your email client linked by default to this user account and when you click on a phone number, your linked softphone application can be opened via the setting configurable in the administration of WICE.
If you have the general right to export addresses from WICE, then the optional link to list all addresses is displayed. So this offers you the possibility to list all addresses in a single list without changing the pages and you can use this feature to print it via your browser directly.
Adding a new Address
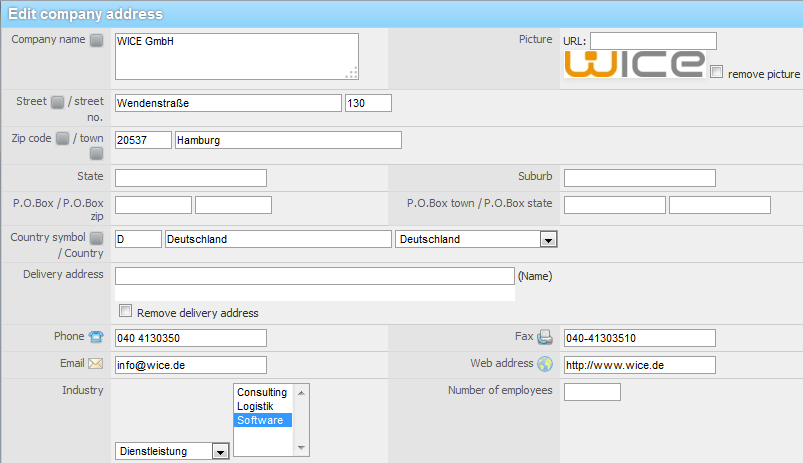
Click on "New entry" and you will get to the input form to create a new address:
Here, you can enter the company-specific data in the input fields. Input fields marked with a grey box are indicated as mandatory. These must necessarily be filled. Otherwise, your address can not be added.
| Hint: Please note that from WICE release 7.5 onwards also individuals in WICE can not only be added as a Company address with the respective associated contacts can be captured, but also directly as Contact persons without to be assigned to a company. |
For each address, you can include a company logo that is displayed as a thumbnail in the address list view and in a larger version in the address detail view. You can either directly add an URL for the logo in the field "Company logo" or insert a suitable logo for example from a XING profile by drag and drop. Alternatively, a search function is available. It opens in a new window and searches the Internet using the company name and other criteria to find a matching logo. You can then select from the 5 best results a matching logo after completing the search, which is then automatically added.
Optionally, you can define an address as a delivery address in the field "Delivery address". To do this, you must enter the company name in the search box and WICE shows the matching search results and you can then select the desired address out of the list with the search results. This delivery address is then shown as an additional address when creating chance-based documents in tickets assigned to this address. You can change the address at any time later by running the search again and assignment another address.
When entering the E-Mail and URL address in the respective fields in the correct form you can click on the address to send an email directly from here or click on the URL to open the home page.
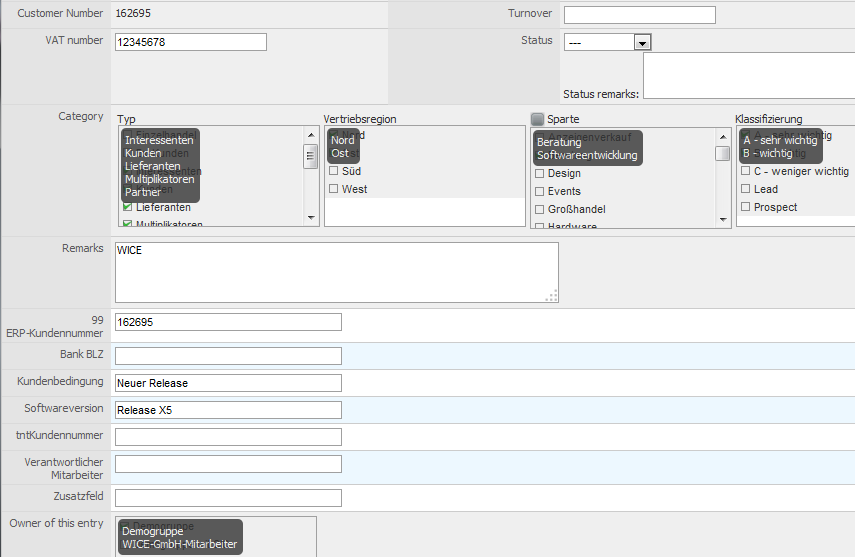
By setting the "Status", you have the possibility to lock this address. Select a status and enter the reason for locking the address in the underlying field "Status remarks". A locked address is not only displayed for your information, but also means that this address is not considered in the selection of address lists, i.e. for the creation of mailings etc.! In the address list and the detail view a "Locked" - icon is displayed so that any user immediately sees that this address has been locked.
The customer number assignment is done automatically, which means that it can not be manually assigned.
In the field turnover the total revenue will be shown which you have realized with this address/customer. Therefore the sum of all closed opportunities is displayed here. You can not enter any turnover values here which is why this field is no longer available to be filled manually and only shown in the address detail view.
In the "VAT Number" field, if known, you can store the information for this customer or supplier. This can be inserted then, optionally, in chance-based documents.
Assigning the address categories is vital for your address quality. This helps you with the segmentation of the addresses. Addresses with specific categories can easily be selected for E-Mailings or printed mailings that can be created within the campaigns module. Furthermore you can find these categorized addresses easier by selecting them in the address list view. The address categories are generally adjustable and are set by your administrator. The already selected category entries are shown inside each category window to make it easier for you to get an overview if there are multiple assignments within each category.
In addition, you can add remarks to any address in the text box provided for this purpose. Additional input fields you need to use for providing additional information for your addresses, can be set up by your system administrator as custom fields.
To assign an address only to a specific user group, you can assign each entry to one or more groups of owners. To do this, click on an existing user group to select it. The already selected category entries are shown inside each category window to make it easier for you to get an overview if there are multiple assignments for the owner of this entry. The address is then only visible to the users of the associated group(s) or can be only edited or deleted by users with the required rights.
| Important: Only the user groups to which you are assigned to are displayed here. If no group is selected, the address is visible for all users. Any existing entry may also have other owner groups, who however can not be modified by you. |
Finally click on "Save" to add your new address and you will see the detail view of your new address.
Duplicate check
After adding a new address, WICE may come up with the information, that your new address already exists in the system and this screen is displayed:
Now, if the address that you added really is a new address, you can select "New" and your new address is saved as a new entry in the system. If you select the option "Merge", so that the existing address is merged with your new input (contact persons will not be merged but added). Warning: choose this option only if you are certain about the results, otherwise information could be lost!
As a third option, you can choose the option "DB address", your entries will be discarded and your new address will not be stored and you can continue to work with the already existing address.
Address search
You can search for addresses in many ways.
Searching via address categories
If you want to display addresses of all existing companies (e.g. customers, prospects,suppliers, partners, etc.), select "company" as address type in the first drop down menu. Ignore any of the other pull down menu's for the address categories. Now click on the "Go"button. You will get all company addresses listed or depending in which address type you are, listed all contact persons or employees etc.
By using the pull down menu's with the address categories you have the possibility to select addresses by the assigned category attributes. You have already assigned these attributes to the addresses while adding or importing your addresses.
You can sort and list addresses according to different categories, as for example all company's marked as customers, potential customers, suppliers, partners, or by the products and services or in combination only all addresses marked as customers limited to certain areas etc. depending on which attributes you have available in your categories.
The available category attributes has your administrator previously added to the needs of your company so if you need any changes or additions to them you will have to contact him.
Searching for a company name or customer number
To directly search for a company name or customer number use the search box "Search for:". Just enter the company name or the customer number and the results of your search will be displayed when you click the "Go" button.
| Hint: If you find here for example the company "123-Test GmbH" and enter in the search box only "123", then, WICE interprets this as customer number and the desired address may not be found. In this case, you need to supplement your search through the "%" sign as a wild card, so enter "123 %" in the search box. Then the corresponding entry as a result of the search will be displayed. |
Alphabetical search
In the address module, you have the ability to display addresses alphabetically. Simply click the desired letter in the alphabet list displayed below the list of addresses. The corresponding address records are displayed immediately.
Advanced search
To search in any available address field click on advanced search. Now, you get a similar mask as for entering a new address. You can here enter any combination of search criteria in these fields. All search results with the appropriate search term will be displayed. In this way, you can search in your address data with the most varied combinations of criteria. To the execute your search, click the button "Search" either underneath the field for the company name or at the bottom of the screen.
| Tipp: With all types of search methods, your search criteria can be stored as your individual WICE-Views on your Dashboard to have them ready for frequent use when needed. Find more information about setting up WICE-Views in the chapter "Dashboard" |
Working with addresses
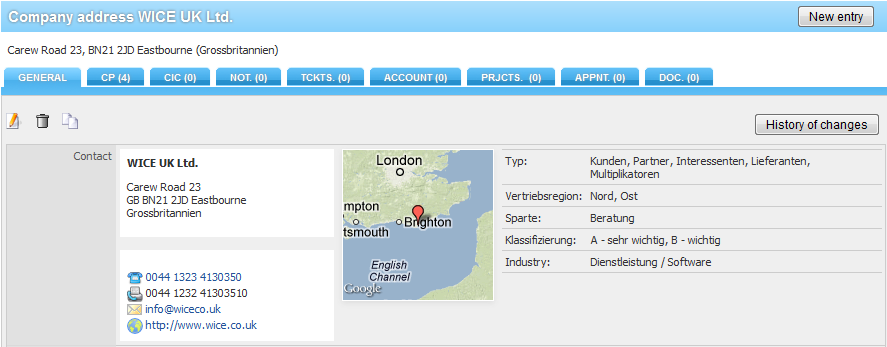
If you want to edit an address, i.e. make changes in the address data. Click on the name of the address that you want to change. You now see the detail view of the address.
| Tipp: If an entry for a link to an external map provider is stored in the administration of your WICE client, then a map view for this address is displayed in the detail view. By clicking on the map, a new browser window opens and puts you right into the map view for this address. |
History of changes
With this feature, a user with administrator rights can undo any changes to an address. To do this click on the button "History of changes". It opens a window with an overview of the recent changes applied to this address. In the columns displayed, you see the time stamp, the user name, when the change was made and the information that has been changed and the old and new values before and after any changes. You can undo all or selected changes and with a click on the button "Revert selected changes" revert them.
Please note that this function is only available to users with administrator rights!
Editing an address
To edit an address click on the "Edit" Button. Now, you can make the desired changes in the appropriate fields. In addition to the changes of the basic address information, you also have here the possibility to assign other address attributes to the categories.
You can also lock an address with an indication of the status, as well as general remarks can be added. Once you have completed your changes, click on the Save button on the bottom of the window.
You will then return to the detail view of this address.
| Hint: In the detail view of an address and of a contact person you will find the information which user has made the last active changes to this entry and the information when the database record was last updated. Please note that "Last address edit action:" means that a WICE user has changed the entry, E.g. by editing the address, or performing an import with activated update function, or by changing the category configuration. "Last database entry update" means that the DB entry was changed. This can happen by cronjobs, manual adjustments to the DB etc., which are not directly linked to user actions during editing an address manually, but also through actions from plugins |
Deleting an address
When deleting an address you have the option to use the trash bin before permanently deleting an address. Your system administrator has set up the attribute "Trash" or "Trash bin" in the first company address category and when deleting an address it is tagged with this attribute. Only if the administrator empties the trash bin, all the addresses from this category are finally deleted. If there is no attribute for the trash bin is set up, the address will be directly deleted.
To delete addresses the necessary user rights need to be assigned to you or your user group in the Administration - otherwise the delete button or the trash icon is not available!
Please keep in mind that you can not undo a deletion!
Click on the Delete Icon/Trash Bin. The address will be deleted. You will return automatically to the main view of the address module.
Copying addresses
You can create a copy of any existing address. To do this, click on the copy button in the address detail view. This creates an identical copy of the address. To indicate that this is a copy of an existing address the extension "(COPY)" is added to the name of the address. You can now edit this copied address e.g. rename it etc. as usual.
Address relations
You can define unlimited relations between your company addresses which are then alternately displayed for the associated addresses. Your WICE administrator has already created the categories for this relations to select from.
To create a new relation, go to the address detail view of the address where you want to add the relation and click on blue arrow next to "New address relation". The mask is extended to this view:
First select the desired category for this form of relation from the menu and then search in the search box for the address to associate with this entry. Your search results are limited depending on the matching criteria found. Select the address in the list of your search results and then click on it, so that it is applied to the field. Click now on Save to save the new address relation.
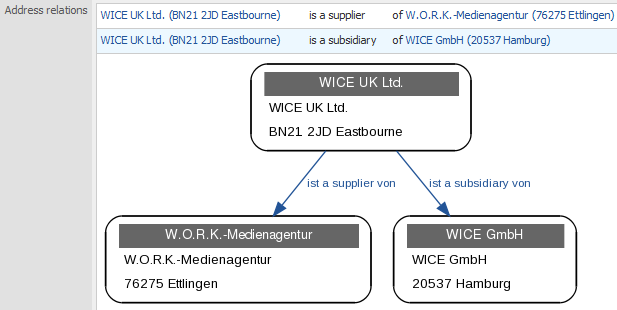
Your newly created address relation is now displayed in a table as well as in a graphic of all the entries associated with this address. The graphic is automatically generated or updated. By clicking on the name of the address in the graphic or table the address detail view of the associated address appears.
You can create as many more address relations for this address as needed. You can delete existing address relations at any time by clicking on the "trash-bin" icon at the respective address relation. A prompt is displayed which you must confirm to permanently delete the relation.
Contact Persons
Generally contact persons are always linked to a company address because these are the people who work at the company they are linked with and can therefore be assigned to tickets and appointments or projects created for their company address.
But you can create contact persons not only linked to a company's address but from WICE release 7.5 onward also as individuals without an assignment to a company address. Please keep in mind that no tickets or project can be created for contact persons but only for company addresses. Contact persons that are not linked to company addresses can of course be assigned to ticket notes.
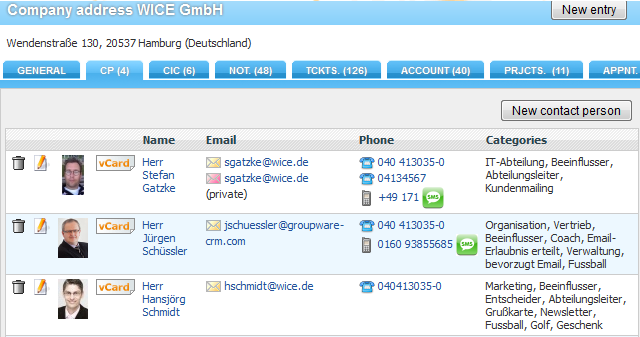
In the tab "CP" (Contact person) at a company address you see the overview of all contact persons assigned to a company address or in the module "Addresses" you can by selecting the address type "Contact person" see a list of all contact persons available.
Here you see at a glance the contact persons assigned to this company optionally with their photo when deposited and showing their E-Mail address, telephone and fax numbers, as well as other important information such as their position or the division where they are working.
With the VCard button you can create a .vcf file for this contact person to be added in your personal local address book depending on which application is linked with this data format on your computer.
You can also click on the E-Mail address of a contact person and your selected E-Mail client for WICE opens automatically. The corresponding address of the contact person will be entered automatically. With this feature you can easily create and send an E-Mail to the selected contact person.
When you click on a phone number your (supported) phone application will be activated, if the settings to use this option have been assigned in the WICE administration.
If you click on the name of a contact person the detail view of the contact person is shown offering further options.
Contact Person detail view
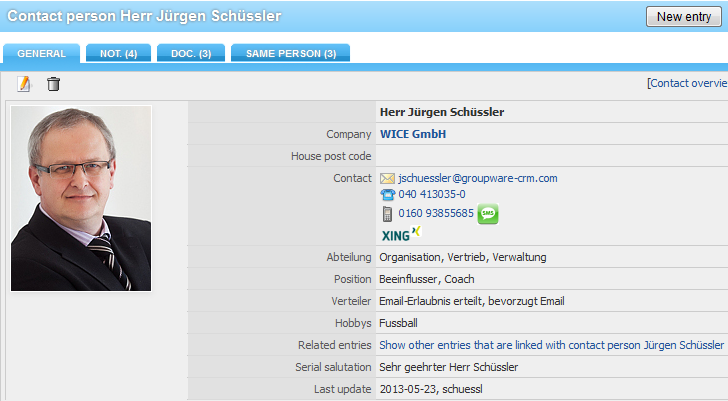
When you click on the name of a contact person in the list of contact persons at a company address you will get to this view:
Here you see the individual details of the contact person, as well as the assigned categories for this contact person which have been associated. Also the serial salutaion, if entered, will be displayed.
When available you can directly access the profile of the contact at the social network XING.
By clicking on "Show other entries that are linked with contact person XXX" the related listing overview appears showing all entries i.e. appointments, ticket notes and projects where this contact person was assigned to as the relevant contact.
You will also see when and by which user this entry was last recently edited.
| Hint: In the detail view of an address and of a contact person you will find the information which user has made the last active changes to this entry and the information when the database record was last updated. Please note that "Last address edit action:" means that a WICE user has changed the entry, E.g. by editing the address, or performing an import with activated update function, or by changing the category configuration. |
You can go back to the overview of all contact persons for this address by clicking on the button "[Contact overview: Company Name]" or by clicking on the company name.
Notes for Contact Persons
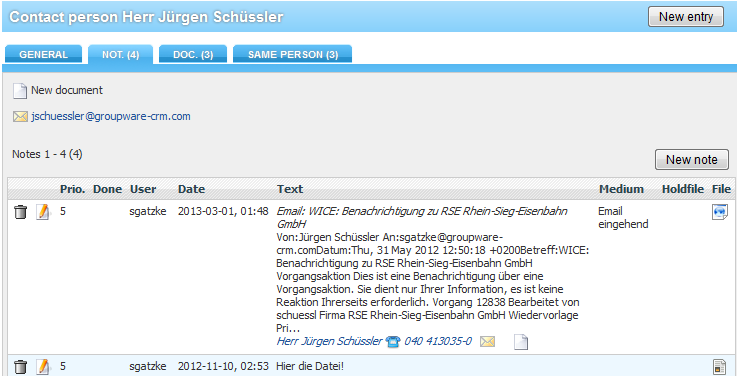
Click on the "NOT." tab to go to the overview of all notes deposited for this contact.
You can create new notes for this contact, similar to an address here. To do this, click on the button "New note" and the mask to enter a note appears.
| Hint: It is generally advisable for a note to a contact person who is associated with a company address to enter this note at the notes tab at the company address and then to associate it with the respective contact person. |
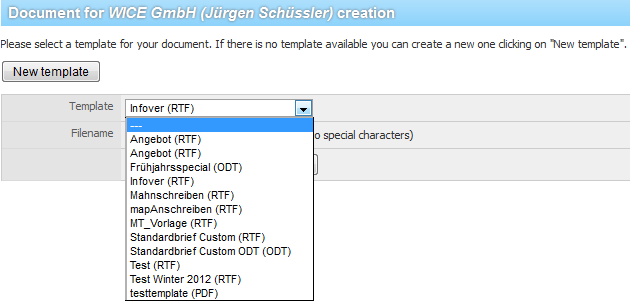
You can also create a printed document for the contact person in this mask. To do this, click on "New document" and it appears the following form:
Now select the desired template from the list of available templates in your client.
| Hint: Please note that this template, so that you can select it here, was created for the address type "Contact person", because other placeholders for the address fields in the template must be used than within a template linked with a company address |
Depending on whether the desired template contains so-called custom variables, these are displayed here and you can fill the template directly with content. If your template contains no custom variables, you can create it directly by clicking "Create document" and it appears the following form:
The document can now either be stored as a new note for this contact person and is so available for further processing, or can be downloaded directly to your computer and opened there. If you click on Go to address view this will take you to the overview of all notes for this company address.
Documents for Contact Persons
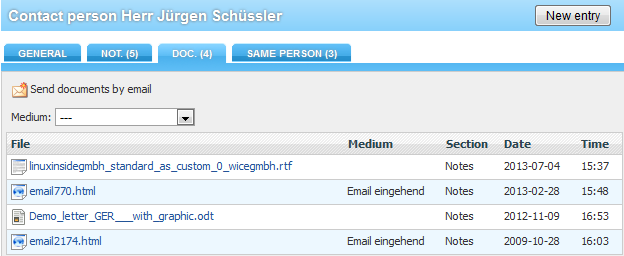
In the tab "Documents" for a contact person all documents that are associated with this contact person are listed:
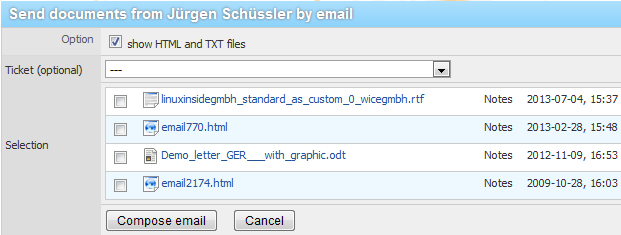
You can here browse all existing documents, as in the documents tab of a company address, using the the media categories as a filter, and send these optionally by email. Click on the envelope icon next to "Send documents by email" and it appears the following view:
Select the documents to be send by checking the check box before each document that you wish to enclose. Optionally, you can store the outgoing email in an already existing ticket for the assigned company address. The email with the documents will be stored there in a new ticket note.
When you have finished your selection, then click on Compose email and the mask to create a new email will be displayed. Enter the recipients address and the other necessary information in the provided fields - the selected documents are already included as attachments - but you can of course manually add more attachments. Click when you have finished creating, on Send mail and the email is sent and optionally stored as a ticket note.
Same person relations
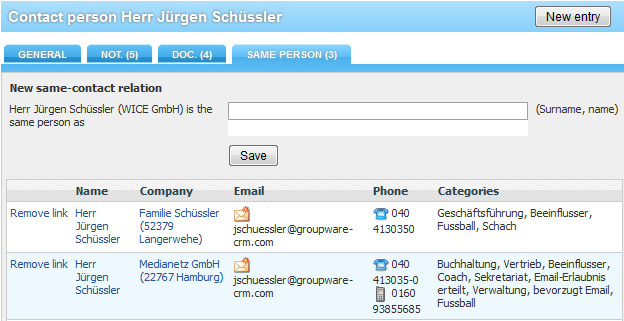
In the contact person detail view click on the tab "Same person" and it appears the following view:
Here you can now establish a link for the same contact persons which are associtated with different company addresses. This is used to indicate that contact persons that are stored on different company addresses, yet are the same person.
To create such a link, first find the desired person in the search box, and then select the person from the list of search results. Click on the button Save and the person is now included in the list of linked contact persons.
Click on "Remove link" to delete such a link at any time.
Adding a new contact person
If you want to create a new contact person click on New contact person in the list of contact persons of a company address or if you want to create a contact person without assigning it to a company address change in the address module to the address type "Contact person" and then click here on New entry.
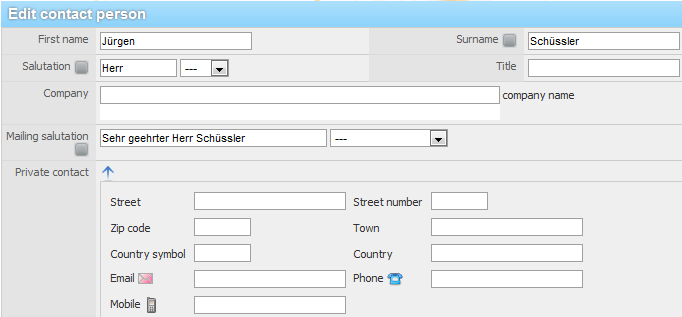
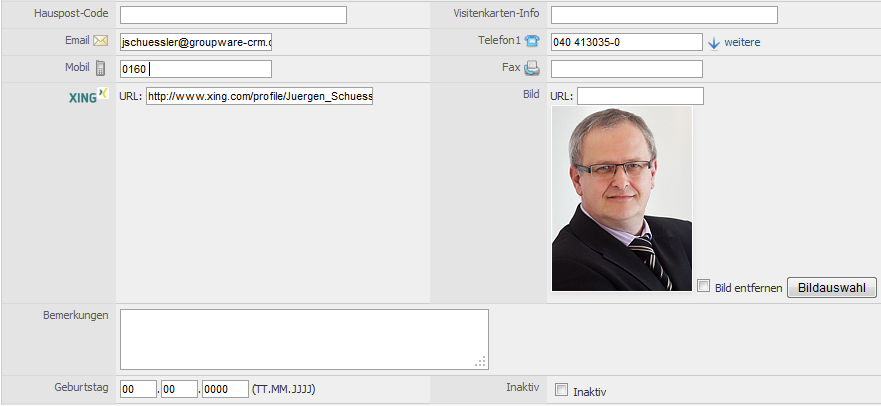
Screenshot: The upper part of the screen to create a new contact person with the options to store the private contact persons information
Enter the required details to create the new contact person, such as title, full name, telephone (optionally additional numbers), fax and e-mail address here. To create a serial salutation for a mailing or a document template, fill the corresponding entry fields, depending on the gender of the person. In the field "Company" you will to which company addrres the contact person is assigned to. When you create a new contact person directly from a company address, then the contact person is automatically linked to the company you selected. This can be changed at any time or completely deleted, if a contact person should change the company or no longer work for it.
Also you can define, by extending the mask by clicking on the blue triangle, the home address for each contact. This is the General address of this contact for contact persons without company assignment.
You can also insert a link to the profile of the contact person at the social network XING here. Simply copy the URL in the to field. Keep in mind that this link takes only's profile on XING, if this has been marked by the person not as private.
Optionally, you can bind a picture of the contact here directly. To do this you must either here insert the URL of the image in the corresponding field or but you can embed the image directly by drag & drop from a social network such as Facebook or XING here. Drag the image to do so simply by holding down the left mouse button from the profile of the contact person here in this mask and it is incorporated directly and in the contact address.
You can search directly for a suitable image - click image selection and get suitable suggestions from a direct Internet search appears in a new window. You can be found a suitable image, should this take over directly into WICE.
Under categories, you have the possibility similar to the companies, to select for example the position of the contact person and Department and associate.
Input fields with * mark are mandatory. This must be completed, otherwise you can not save the record.
The contact categories, as also the range of serial letter styling, has previously defined by your administrator and set.
On the "Inactive" checkbox you can exclude, if you enable them, this partner to participate in mailings. It also may be furnished additional fields here are displayed, which are available for contact in your WICE client available - you can fill them here.
Finally, click Save settings. The new contact is now set and will be shown in the detailed view of the contact person.
| Hinweis: Please note that if you have created a new contact, and you then are in the contact details at any time via the link to the company to the associated company can get. A contact person without corporate assignment there is not this detail view - this takes you automatically to the tab "General" contact! |
Editing a contact person
The tab menu, click the Edit button of a previously created contact contact. The input/change of the corresponding data immediately enters the editing window to change.
Alternatively you can call the contact detail first by clicking on the contact name and there click on the Edit button. Click, after you have made your changes to apply this conclusion to input save.
Notes
After you have selected the desired address, click on the company name. Then select the tab notes.
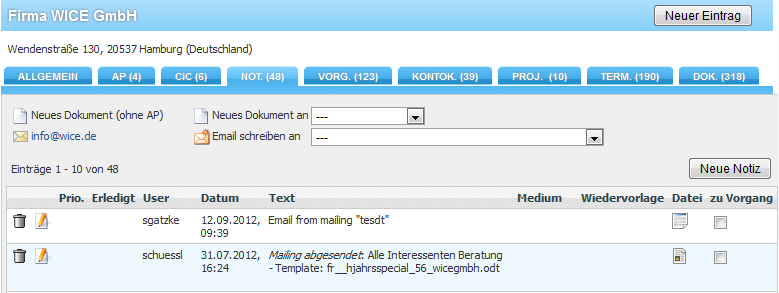
In this tab, you will see all of the notes that are assigned to the address. Here the number of deposited notes in brackets will be displayed in the tab.
You can also directly in this section 1.) directly documents without link to a contact person or 2.) create a shortcut to a contact person or but 3.) Emails to which produce stored contact person at the address, send, and automatically drop them a note:
1.) to produce a new document without a contact, click "New document (without contact)" and appears in the edit field of the Dokumententemplates deposited in the client. This you can now select and then click "Create document". Finally, you can then choose whether the document as a new note at the address is to be placed or to be loaded on your computer download.
2.) to create a new document to a particular contact person at this address, select "New document" to the contact from the list in the box and proceed then as described above.
3.) to send an email directly to one in which address to create stored contacts, select the contact from the list in the box "Create email". It opens the mask to create an email of the WICE CommCenter then, if this is configured in your profile, and you can create the email as usual and send off.
Back in the overview of notes existing at the address, you see in the collection in addition to document to the note associated with the date, the priority, the text of the note, as well as the do this chosen medium (shipping) and the. To do this, click the file allocated under document, so it is opened automatically, or You can decide how you want to open the file or use.
If you already note want to convert one in an action to assign a task, then select one or more notes check box and then an operation that exists at the selected address you want to associate the Notiz(en) which in the drop-down menu at the end of the list and click Convert then click < b > action < / b >.The selected note is now filed the action in the process. ' ' Please keep in mind that to be able to convert Notes to process actions, also already at least one operation at this address must be present! "'
| Hinweis: Please note that even mailing entries as notes to the respective addresses are stored or Incoming emails can convert into a note, to assign them to an address or following an operation! |
Adding a new address note
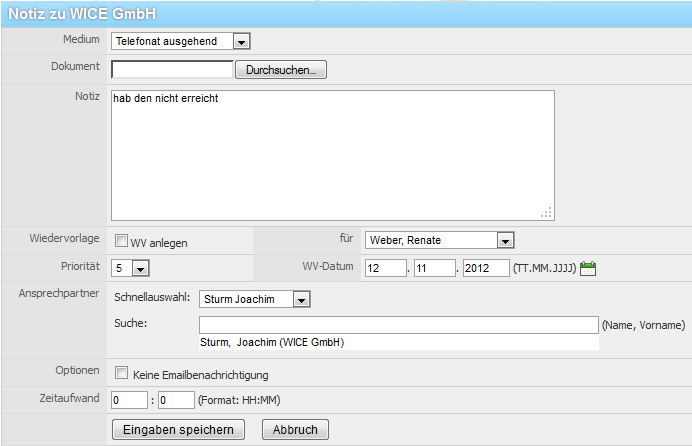
To enter a new note an address, click entry click New. You now get the mask for a new note.
Under medium from the list box, select the medium (dispatch or contact type) of the note.
Under the document, click Browse... You will automatically reach the Explorer style of your computer. Here, select the file that you want to attach to the note. In the input box of the path is displayed, in which the document resides.
In the note field, enter the description of the note in any form. This description is then displayed in the respective note in the overview.
You can create now optionally this note to a resubmission for themselves or a particular employee in your company. To do this, enable the check box and select the desired person from the list box.
Select a priority from 1 to 10, appropriate for you, as well as the date when this note/resubmission should be done in priority from the list box.
This note appears in the resubmission of the module "Dashboard" tab.
Finally, you can assign one contact, so the person in the company with which you want to associate this note. Either use the quick selection or but the interactive search - enter just the first few letters of the last name of the contact person for this purpose. WICE automatically displays found results. Click to select the desired contact person.
| Tipp: The desired contact doesn't have to be at the address stored at which to place the note, but must only basically exist as a contact person for a company address! |
Enter a time using the hours and minutes in the concerned fields.
You want that the assigned employees to receive an E-Mail notification, select the corresponding check box
Finally, click Save to settings.
The newly created note appears immediately in the Notes tab.
Editing an address note
If you want to edit a note, click at the desired note under Wiederv / edit on the Edit button. The note immediately appears in the window to capture. Make your changes and settings, click save.
Tickets
When a company address the module "Operations" (Vorg.) with all tasks associated with this address as a tab is displayed after selecting a desired address.
774px
Screenshot: Overview of operations that have been applied to an address
You have the possibility that operations in the same module or under "Adressen|Operations tab"create new, edit, or delete, and we recommend the operations starting from an address to apply.
| Tipp: You can get more information about the individual operations by driving me your mouse pointer over the task subject – it opens a window with more information about the operation and the last operation action by mouseover |
So first select the desired address and click on the company name. Then, click operations on the tab. Here the number of operations applied to this address will be displayed in the tab.
See all disconnected operations to this address with an indication of status, the date, and the corresponding request and of the competent employee here at a glance. Also see the monetary figures of the respective operations in sales, raw revenue and expense columns and at the end of the collection the corresponding sums.
Do you look at already closed operations, so please select the checkbox "show also closed operations". Then, it displays also the already closed operations.
Creating a new ticket
To create a new task, click process new. Then appears in the input mask to the investment of new operations.
Get more information about the processing of operations hereAccount
Tab you get an overview of current account all invoices created for this address and any payments received from a customer.
In the field of customer discount, you can enter a percentage value. Here stored value will then automatically when creating opportunities in an operation which has been created for this address, taken into account. So, you can assign a general discount for all items ordered this customer. After you have entered the value in the box, click on "' save your entries"' to incorporate your changes.
| Tipp: For customers with registered offices abroad, you can activate the check box "Not rated". This option causes the control by default is in the opportunity screen set to "0" after selecting an article. So you must not manually correct the tax for each item in the chance. Click here on the check box to enable the option, and then click save your entries |
In the first part of the mask you see the created invoices. Unpaid amounts are displayed in the column balances in red and have a leading minus. Please keep in mind that when corrected invoices the total amount of the Bill affects not the customer's balance. Payments by the customer, that a corrected invoice instead of the invoice correction were associated, are counted in the wallet but.
By clicking on the account number in the No. column opens the invoice in PDF format or You get a choice of how you want to proceed with the file - you can send for example optionally directly by fax or letter via our partner Fax.de or in the browser or in the linked application view. By clicking on the number in the column operation appears in the corresponding operation.
By clicking on "Korr.", you can create a correction account for the selected invoice. After you create a correction invoice appears in the column "the appropriate invoice number in the correction invoice and the amount corrected by" or credits be adapted if necessary and represented the entries deleted.
At the bottom of the screen, you will receive an overview of existing payments.
769px
Screenshot: Overview of previous payments to an address
Here you see date the payment has been detected, the account to which the payment was collected and any remarks, such as partial payment or 1st rate etc, and the respective amounts.
Adding a new payment
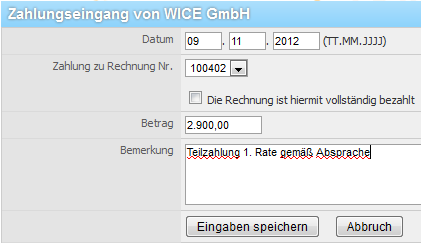
Want to register a payment now, so click on the appropriate link of new payment < b > register < / b >. It opens up the mask to register a payment.
Enter the date of the receipt of the payment. In the selection list, select the appropriate account, and enter the amount of the payment in the amount field. In the comment text field, you can enter a free comment on this payment has been received. If you enable the check box "The Bill is hereby fully paid", so you can assign payment receipts to save this Bill!
Press now save on settings.
Then you can return to the tab account and your payment has been successfully registered. In addition, the receipt of payment in the overall list of the payments was registered. You can find this list in the module "Sales".
If a payment is to be changed later, so click on the Edit button next to the desired entry. It opens then the mask to the editing of the receipt of the payment. Now enter your changes and click settings then click < b > save < / b >.
Your changes are now being applied.
Projects
At the root of the address data the module "Projects" as a tab is displayed after selecting a desired address. Please click here for an overview of the projects associated with this address.
Please keep in mind that you can create new projects in the "Projects" module.
Editing projects
Did you click the desired title in the browser, so go to the overview of the project with its tasks. Further to the use of the module projects hereAppointments
This tab shows all dates associated with this address. You will learn here also the place and the resources booked along with the date.
Via the button "iCal" before the respective date, you can pass the date directly in iCal format to your local calendar. It starts each application, the iCal format is associated with that on your computer.
You can create a new visit report to a date here by clicking on the button visit report directly. Go directly to the mask to create a visit report.
| Tipp: If you move your mouse pointer over the title of a date in the list, so a new window opens automatically as sog ToolTip with additional information about the date. |
For dates that have already taken place, in which "Even past dates show" click the check box appears.
To create a new appointment for this address directly, click date click New and enter the mask to create a new appointment. The associated address is then automatically assigned to the appointment.
Documents
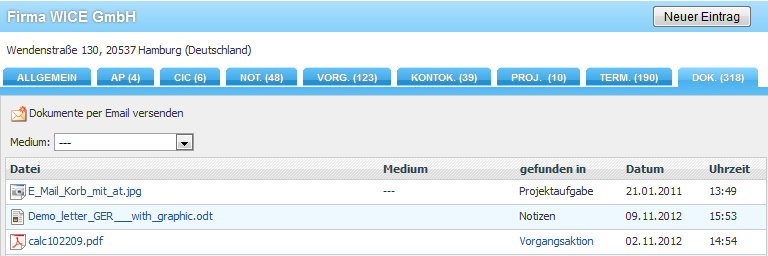
In this tab to the address you will find all documents or files that were associated with this address.
The documents may come from a note, an action, a task or a project task. About the corresponding column "found in" can trace the origin of the documents. On the pull down menu, you can select if you want only the display of documents of a specific category, E.g. all offers, invoices, or visit reports. You also see the date and time when the document was filed or produced.
To display the documents according to your categories they must accordingly with when creating a media category can be fitted.
If you click on the document title in the "File" column, thus opens this file in the appropriate application, you can download these or additional options available. There is E.g. a document from an operation, so click on "Process action" in the column "found in" and get so to the action in this process where the document or the file has been deposited.
Select all files that are stored here to send those collected via email to any recipient. To do this, click the envelope button "' send documents via email"'. Now to choose the available files will be displayed. In the, you can list all HTML and TXT files display, which were deposited at the address, select a process in the delivery of email as a new process action should be deposited. If you have selected the desired files, click on compose email and enter the mask to create a new email.

